


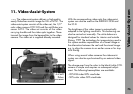

Video-Assist-System
78
Note: If the video carrying handle remains on the
camera when dismounting, the opening on the carrying
handle should be closed over with the supplied protec-
tive cover.
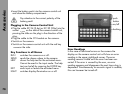
Wiring the Video-Assist-System
• Plug the anti flicker processor AFP-2 through the
socket MOVIE CAMERA with cable KC 37 into one of
the RS-sockets on the camera.
• Plug cable KC 34 into the socket VIDEO CAMERA on
the anti flicker processor AFP-2 and into the video
camera.
The video signal for the monitor is possible on two
sockets on the anti flicker processor AFP-2:
Minimonitor: socket MINI MONITOR
Standard video monitor: BNC-socket VIDEO OUT
The BNC-socket „VD“ on the video camera
CCD 2-FR is used for synchronization with an
external video signal. Do not use as a video
output!
• Set the code switch on the underside of the anti flicker
processor to „A“.
• Adjust focussing and image position on the video
camera. See below.
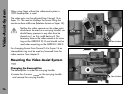
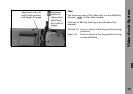
Adjusting the Video Optic
Adjusting the Image Position
• Loosen the clamp ring approx. 15° (as seen in
the direction of shooting, counter-clockwise).
• Adjust the angle position by turning the CCD-camera,
at the same time checking the image on the monitor.
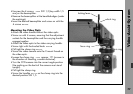
• Set the width position with the adjustment screw
SW 1,3, taking care that on loosening the
adjustment screw the image follows, otherwise press
the CCD- camera at the screw-on position slightly
upwards.
• Retighten the clamp ring.
Adjusting Focus
• Loosen the aperture clamp with the aperture adjust-
ment knob ; this also unlocks the focussing
adjustment ring .
• Completely open the aperture.
• Set focus through the monitor with the focussing
adjustment ring.
• Set the aperture to the monitor.
• Pull tight the aperture clamp.