


d Set Original Type to the item that best describes your original photo.
•
For example, if you are scanning a glossy photo printed on your inkjet printer, then select Inkjet Glossy Photo.
• If you are scanning a glossy photo purchased from a photo print service, then select Retail Glossy Photo.
5 Start the scan job.
Scanning directly from the printer control panel
1
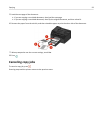
Load the photo or photos facedown on the scanner glass.
Note: If you have sheets loaded on the ADF and photos loaded on the scanner glass, then the sheets on the ADF
will be scanned. Make sure to clear the ADF if you want to scan the photos on the scanner glass.
2 From the printer home screen, navigate to:
Scan > select a scan destination
If necessary, follow the instructions on the printer display.
Note:
If you have selected a computer as the scan destination, then make sure that the scan software is
installed on the destination computer.
3 From the Choose File Type menu, select Photo.
4 From the Scan Options menu, select an appropriate setting.
Touch Accept each time you make a selection.
a Set Quality to 150 dpi or more.
b Set Content to Photo
c Set Content Source to the option that best describes your original photo.
• For example, if you are scanning a glossy photo printed on your inkjet printer, then select Inkjet Glossy.
• If you are scanning a glossy photo purchased from a photo print service, then select Retail Photo.
5 Press .
Scanning documents for editing
An Optical Character Recognition (OCR) application allows you to edit an original text document that has been scanned.
In order for this to work, you must have an OCR application stored on a local or network computer and you must be
able to select it from the list of applications when you set up the scan.
When selecting settings for the scan, select to scan to the local computer or network computer where the OCR is
installed.
For Windows users
1 Load the original document faceup into the ADF or facedown on the scanner glass.
2
Click or Start.
3 Click All Programs or Programs, and then select the printer program folder from the list.
4 Navigate to:
Printer Home > select your printer > Scan > Document
Scanning starts and the scan progress dialog appears.
Scanning 64