


8-13
User Guide for Cisco Show and Share 5.3.x
Chapter 8 Live Events
Procedures
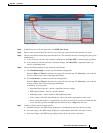
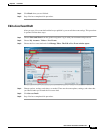
b. Video Categories
–
Click Do not categorize my video
–
Click Categorize my video—Specify an existing an existing category name or create a new
category.
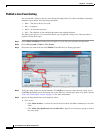
Step 6 Specify the Scheduling details:
a. Click Immediately—to make the listing visible now.
b. Click At a scheduled time—to schedule a future time and date for the listing to become visible.
–
Enter the Date and Time values.
Step 7 Click OK to publish the listing for the live event.
Step 8 Stop. You have completed this procedure.
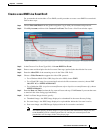
Send a Live Event Notification
You must create, save, and publish a live event draft before you can send a live event notification. This
procedure is required. Follow these steps:
Step 1 Choose Show and Share from the global navigation. Log in with your username and password.
Step 2 Choose My Account > Videos > Live Events.
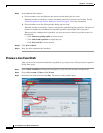
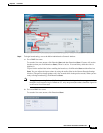
Step 3 Choose the live event that you want to advertise and click Play.
Step 4 When the selected live event page opens, copy the event URL displayed in the browser address bar.
For example:
https://abc.com/vportal/VideoPlayer.jsp?ccsid=C-a0cc544d-e57d-41e5-a7cc-9c1e5b8369cd:1
Note Do not use the top-level Show and Share portal URL; using the portal URL could cause network
congestion during viewer log in.
Step 5 Paste the selected live event URL in your email notification. Send the email.
If you restricted access to specific users or groups when you created the event, only the authorized users
can log in and view the event.
Step 6 Stop. You have completed this procedure.