


1-26
DXC-D30WS/P(E)/V1
Chapter 2 Fitting and Connections
38
Chapter 2 Fitting and Connections
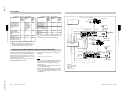
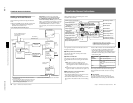
Camera Adaptor Power Supply
The camera adaptor automatically operates on power
supplied to the VTR/CCU/CMA connector from the
portable VTR, CCU-M7/M7P Camera Control Unit,
CMA-8A/8ACE AC Adaptor or other connected
device.
Note
Before use, check that the device connected to the
VTR/CCU/CMA connector is able to provide the
power required by the camera.
If it is not able to provide the necessary power, or
when it is necessary to prolong the operating time, use
the camera with a separate power supply.
Power Supply
Chapter 3 Shooting
39
Chapter 3 Shooting
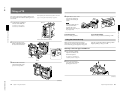
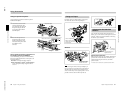
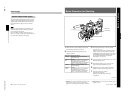
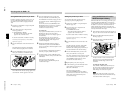
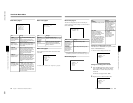
Basic Procedure for Shooting
Chapter 3 Shooting
1
Attach the VTR or camera adaptor to the camera
head, then turn each device’s power on.
2
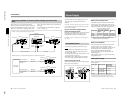
Set the FILTER control appropriately for the
lighting conditions.
3
Check the switch settings on the camera head.
(See pages 11 to 15.)
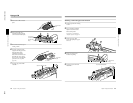
If there is not sufficient time to check the camera
settings, you can use “easy mode” by setting the
EZ MODE switch to the ON position. The camera
is automatically adjusted to standard settings, and
the iris and the white balance are adjusted
automatically. (See page 61.)
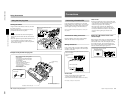
4
Check the settings in the basic menu (page 51) and
advanced menu (page 57).
5
Check the lens settings (pages 26 and 27) and
flange focal length adjustment (page 80).
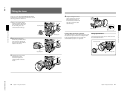
6
Adjust the eyepiece focus, and the contrast and
brightness of the viewfinder image (page 79).
7
Check the sound system settings.
•Microphone connections
•Settings on the VTR (refer to the VTR
instructions)
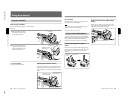
FILTER control
Focusing ring
RET button
VTR button
ZEBRA switch
POWER switch
(continued)
1) Hunting: This occurs if the automatic iris function is not
able to reach a stable state, and as a result the image
brightness keeps changing, alternately lighter and darker.
2) Depth of field: This is the range over which the subject
is sharply in focus.
..........................................................................................................................................................................................................
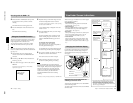
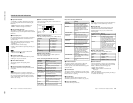
Filter setting
Lighting conditions
1 (3200K) Studio halogen lighting (incandescent),
sunrise and sunset.
2 (5600K +
1
/
8
ND)
Sunlight.
This setting includes a
1
/
8
neutral density
filter (reducing the exposure by the
equivalent of three stops). Use it to prevent
hunting
1)
or to reduce the depth of field
2)
.
3 (5600K) Cloudy or rainy outdoor shooting, and
fluorescent lighting.
4 (5600K +
1
/
64
ND)
Sunlight.
This setting includes a
1
/
64
neutral density
filter (reducing the exposure by the
equivalent of six stops). Use it to prevent
hunting
1)
or to reduce the depth of field
2)
.