


1-33
DXC-D30WS/P(E)/V1
52
Chapter 4 Viewfinder Screen Indications and Menus
Chapter 4 Viewfinder Screen Indications and Menus
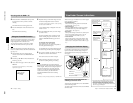
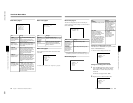
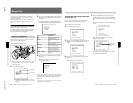
Viewfinder Basic Menu
Basic menu page 2
mA.IRIS:±0
DTL LEV: ±0
M.BLACK:±0
STRETCH:±0
SHUTTER:OFF
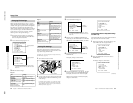
Basic menu page 3
mSKIN DTL: 0.0
DL LVL:STD
Basic menu page 4
This is displayed when the SET UP switch has been
set to FILE.
FILE: *FL
mSELECT FILE
HISAT
CHG FILE
(YESm4)
For details of this operation, see “Setup Files” (page 62).
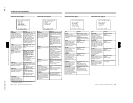
Item
Settings
A. IRIS
Sets a base value
for auto adjustment
of lens iris.
–1.0, –0.5, ±0 (normal value), +0.5,
+1.0
Negative adjustment values set a
narrower lens iris and positive values
set a wider lens iris.
DTL LEV
Sets the detail
(edge) emphasis.
–99 to ±0 (normal value) to +99
Negative adjustment values soften the
image’s edges and positive values
sharpen them.
M. BLACK
Sets the master
pedestal level.
–99 to ±0 (normal value) to +99
Negative adjustment values make
dark areas of the picture darker and
increase the contrast. Positive
adjustment values dark areas of the
picture lighter and reduce the
contrast.
Item Settings
SKIN DTL
Sets the amount of
skin detail
correction.
0.0 (normal value) to 1.0
Smaller values set a softer skin detail.
LOW, STD (normal value), HIGH
Set the amount of DynaLatitude
effects as high level, standard level
(STD), or low level.
DXC-D30: 1/100 (normal value),
1/250, 1/500, 1/1000, 1/2000,
EVS, CLS (60.4 Hz to 200.3 Hz)
DXC-D30P: 1/60 (normal value), 1/
250, 1/500, 1/1000, 1/2000, EVS,
CLS (50.3 Hz to 201.4 Hz)
This selects either the shutter speed
or the scan frequency or EVS for the
clear scan function.
STRETCH
Sets black stretch/
compress value.
–16 to ±0 (normal value) to +15
This function adjusts the intensity of
dark areas of the screen. Negative
values make these areas darker
(black compress) and positive values
make these areas brighter (black
stretch).
SHUTTER
Sets shutter speed
or CLS/EVS setting
(see page 75)
.
DL LVL
Sets the
DynaLatitude level.
Chapter 4 Viewfinder Screen Indications and Menus
53
Chapter 4 Viewfinder Screen Indications and Menus
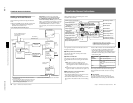
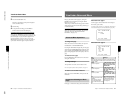
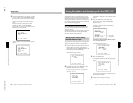
Basic menu page 5
This menu is displayed only when an external sync
signal is input to the camera adaptor or VTR connected
to the camera head.
mSC PHASE:999
H PHASE: 100
a) This applies when using an external sync signal to
synchronize operation of several cameras (see page 34).
Basic menu page 6
MARKER: ON
mDUR TIME:
MM:SS
00:00
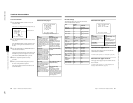
Item Settings
SC PHASE
Sub carrier phase
adjustment for
when camera is
genlocked.
a)
000 (normal value) to 999
H. PHASE
Horizontal phase
adjustment for
when camera is
genlocked.
a)
000 to 100 (normal value) to 199
Setting the recording time in seconds
Move the cursor to DUR TIME, then press the UP/ON
button or DOWN/OFF button.
A value of seconds is displayed under “SS”.
MARKER: ON
mDUR TIME:
MM:SS
00:25
Setting the recording time in minutes
1
Press the MENU/STATUS switch to move the
cursor to DUR TIME, then press the UP/ON
button until the “seconds” value (under “SS”)
exceeds 59.
The minute value appears below “MM”.
2
Repeat step 1 to set the desired time value.
MARKER: ON
mDUR TIME:
MM:SS
01:00
Item Settings
MARKER
Sets MARKER display ON/OFF.
ON (normal value), OFF
MARKER is displayed
when this setting is ON
and is not displayed
when it is OFF.
When the setting is ON,
go to Advanced Menu 4
to select the type of
marker
(see page 58)
.
DUR TIME
Sets the recording time
Setting the recoriding time
before shooting helps you with
making scenes of equal
duration.
When shooting with displaying
the recording time of the current
cut in the viewfinder (with the
REC TIME switch set to DUR),
the recording time indication
flashes to remind you that the
recording time has passed.
00:00 to 59:59 (minute
to second)
See “Setting the
recording time in
seconds” and “Setting
the recording time in
minutes” below.