


1-47
DXC-D30WS/P(E)/V1
80
Chapter 5 Adjustments and Settings
Chapter 5 Adjustments and Settings
9
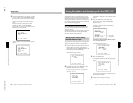
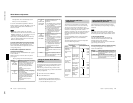
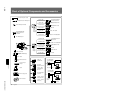
RET
W
T
M
A
S
M
ZOOM
86 5
4,11 2 1
7
3
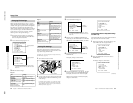
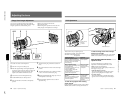
Flange focal length
adjustment test chart
1
Set the iris selector to the M position.
2
Turn the iris ring to f/1.8 (fully open).
3
Place the supplied flange focal length adjustment
test chart at a range of about 3 meters (10 feet), and
adjust the lighting so that an appropriate video
output level is obtained with the iris at f/1.8.
4
Loosen the screw of the Ff adjustment ring.
5
Set the ZOOM selector to the M position.
6
Move the manual zoom control to the telephoto
position.
7
Turn the focusing ring so that the test chart is in
focus.
8
Move the manual zoom control to the wide angle
position.
9
Turn the Ff adjustment ring so that the test chart is
in focus. Do not move the focusing ring.
10
Repeat steps 6 to 9 until the image stays in focus
from telephoto to wide angle.
11
After adjustment, tighten the screw of the Ff
adjustment ring.
Adjusting the Lens
It is necessary to adjust the flange focal length (the
distance from the lens flange to the plane of the image
along the optical axis) in the following cases.
Flange Focal Length Adjustment
•When a lens is fitted for the first time
•After changing lenses
•When during zoom operations the focus does not
match properly from telephoto to wide angle
About 3 m (10 feet)
Chapter 5 Adjustments and Settings
81
Chapter 5 Adjustments and Settings
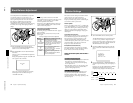
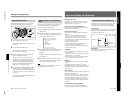
There are three ways of adjusting the iris:
automatically, manually, and with the instant
automatic iris adjustment function.
Iris adjustment
To make the image lighter when shooting
against the light
In the automatic iris adjustment mode, set the A.IRIS
MODE switch to BACK L, turning the indicator on.
Iris Adjustments
RET
W
T
M
A
Iris ring
Instant automatic
iris button
Iris selector
ZEBRA switch
A.IRIS MODE switch
To make the image clearer when shooting a
subject lit by a spotlight
In the automatic iris adjustment mode, set the A.IRIS
MODE switch to SPOT L, turning the indicator on.
Using the zebra pattern in manual
adjustment mode
To use the zebra pattern as a guideline for iris
adjustment in manual adjustment mode, set the
ZEBRA switch to the ON position.
Select the zebra pattern to be displayed in advenced
menu page 4 (see page 58).
•When the subject is a person
Adjust the iris manually so that the zebra pattern
appears on the highlights of the subject’s face.
•For other subjects
Adjust the iris manually so that the zebra pattern
appears on the most important parts of the subject.
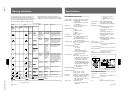
Adjustment method Operation
Automatic adjustment mode
The iris is adjusted automatically to
adapt to changes in the brightness of
the subject. This is the mode for
normal shooting.
Set the iris selector
to the A position.
Manual adjustment mode
Use this mode in the following cases:
• For special effects
• When filming a person with a very
bright sky background
• When shooting a subject with
extreme contrast
The zebra pattern can be used as a
guideline for iris adjustment.
Set the iris selector
to the M position
and turn the iris ring
as required.
With the iris selector
in the M position,
hold down the
instant automatic iris
button for as long as
necessary.
Instant automatic adjustment
function
While in manual adjustment mode,
this function makes a temporary
automatic adjustment.