


3-12
DXC-D30WS/P(E)/V1
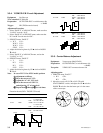
3-3-16. Character Position Adjustment
Equipment: Color monitor (or, B/W monitor)
Preparation: OUTPUT/DL/DCC+ switch/camera side
→ BARS
Test point: MONITOR OUT connector/camera side
Adjustment Procedure
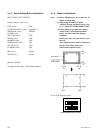
1. Set the “MARKER” to “ON” on the BASIC menu.
2. Set the “MARKER” to “CENT/90 %” on the
“PAGE 4” of ADVANCE menu.
3. Select “PAGE 9” on the ADVANCE menu, set
“16:9/4:3” to “16:9” position.
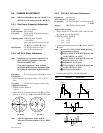
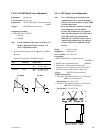
16:9/4:3 16:9:
WIDE ID ON:
VF SCAN AUTO
"b"
"a"
XXdB
XXXX
TONE
XXdB
XXXX
:
PAGE 9 (NEXT PREV )
EXIT MENU (YES )
TONE
Safty zone
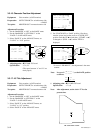
4. Adjusting point: 1CV3/MB-785 board
Specification: “a” = “b”
(The space between “a” and “b” are
nearly equal)
3-3-17. 4:3 Title Adjustment
Equipment: Color monitor (or, B/W monitor)
Preparation: OUTPUT/DL/DCC+ switch/camera side
→ BARS
Test point: MONITOR OUT connector/camera side
Adjustment Procedure
1. Set the “MARKER” to “ON” on the BASIC menu.
2. Set the “MARKER” to “CENT/90 %” on the
“PAGE 4” of ADVANCE menu.
3. Select “PAGE 9” on the ADVANCE menu, set
“16:9/4:3” to “4:3” position.
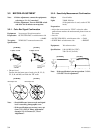
4. Select “PAGE 8” on the ADVANCE menu.
CLOCK IND
CLOCK SET
CAM:
(START ):
97 11 08
14:59
TONE
XXdB
XXXX
PAGE 8 (NEXT PREV )
EXIT MENU (YES )
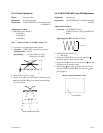
5. Set “CLOCK IND” to “CAM” position, (See above
monitor screen) and set the cursor to “CLOCK SET”
position. Push the UP 4 switch, then, “(START → 4)”
is changed to “(END → 4)” and the TITLE is
displayed.
CLOCK IND
CLOCK SET
CAM:
(START ):
YY MM DD
97 11 08
14:59
"a"
"T"
YY MM DD
97 11 08
TONE
XXdB
PAGE 8 (NEXT PREV )
EXIT MENU (YES )
* In case of “DD MM YY”, the adjustment is the same
manner.
Note : In case of “ ”, set the DATE position
as follows.
MM DD YY
11 08 97
MM DD YY
"a"
11 08 97
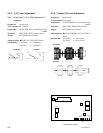
6. Adjusting point: 1CV1/MB-785 board
Specification: “a” = 0
Note : After adjustment, set the clock “T” for the
present time.
CV1
CV3
MB-785 BOARD -B SIDE-