


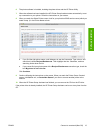


12. Your printer is now connected. In the Printer Queue Created screen, click Quit to exit, or Create
New Queue if you want to connect another printer.
13. When the HP Printer Setup Assistant has finished, you can remove the CD from the CD drive.
If the printer driver is already installed, the HP Printer Setup Assistant can be run at any time from the
CD.
Sharing the printer
If your computer is connected to a network, you can make your directly connected printer available to
other computers on the same network.
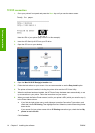
1. Double-click the System Preferences icon on the Dock menu bar on your desktop.
2. Enable printer sharing by going to Sharing > Services > Printer Sharing.
3. Your printer now automatically appears in the list of shared printers displayed by any other
computer running Mac OS and connected to your local network.
Any other people wishing to share your printer must install the printer software on their own computers.
Anyone sharing your printer will be able to send print jobs, but will not be able to receive information
from the printer—which affects printer alerts, printer status reports, paper management, printer
administration and troubleshooting.
You may find that sharing your directly connected printer with other users will slow down your computer
unacceptably.
TIP: The best way to share the printer over a network is to connect the printer not to any computer,
but to the network. See
Connect to a network (Mac OS) on page 12.
Uninstall the printer software (Mac OS)
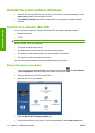
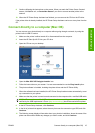
1. Insert the HP Start-Up Kit CD into your CD drive.
2. Open the CD icon on your desktop.
3. Open the Mac OS X HP Designjet Installer icon.
4. Select Uninstall, and follow the instructions on your screen to uninstall the printer software.
To delete the print queue:
●
Under Mac OS X 10.5: from the system preferences, select the Print & Fax dialog. Select the name
of the printer and click the – button.
●
Under Mac OS X 10.4 there are two ways of deleting the print queue:
◦
from the system preferences, select the Printing pane of the Print & Fax dialog. Select the
name of the printer and click the – button.
◦
from the Print Setup utility, select the name of the printer and click the Delete icon.
16 Chapter 2 Installing the software ENWW
Software installation