


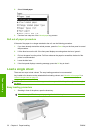


6. If you wish, use the Change Printing Properties button to change the following properties:
●
Paper Thickness: This is relevant to carriage height or platen gap. You should choose
High if your paper weighs over 250 g/m² or if it does not have a plastic coating.
●
Dry Time: The recommendation is to use Automatic by default and move to Extended if
needed.
●
Starwheels: Print with the starwheels up or down.
●
Cutter: Enable or disable the cutter.
●
Global Ink Limit: Initially it can be left as it is and modified later on, based on printing results.
●
Gloss Enhancer Amount: Initially it can be left as it is and modified later on, based on printing
results.
NOTE: When an option is grayed out, that means that it is not available for the selected paper
type.
Some paper types are available with different ink limits (less/normal/more ink). Ink limits are
generally proportional to color gamut volume, but a higher ink limit can cause printing artifacts
(bleed, coalescence, etc.) in some cases. HP papers have fine-tuned ink limits while other papers
use generic ink limits.
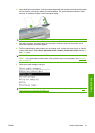
7. Click Next under Windows, Continue under Mac OS.
8. Load your custom paper, see
Load a roll into the printer on page 25 or Load a single sheet
on page 30. You will find the paper name in the Custom paper category in the front panel.
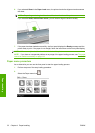
9. Under Windows, select yes when asked to calibrate paper. Under Mac OS, select Paper Preset
Management > Calibrate Paper. For more information on color calibration, see
Color
calibration on page 60.
10. You can print an image of your choice to check for color gamut, coalescence, mottle, bronzing and
gloss uniformity. If the results are not satisfactory, you can change printing properties and launch
another calibration. For instance:
●
For better color gamut, increase the ink limit or select a "more ink" variant of the same paper
type if available.
●
To reduce coalescence, decrease the ink limit and/or the amount of gloss enhancer or select
a "less ink" variant of the same paper if available.
●
To reduce bronzing or improve gloss uniformity, adjust the amount of gloss enhancer.
For more information, see the online help
in the Color Center.
11. With your final printing properties, you can now create an ICC profile for the paper using one of the
following three options:
●
The standard process with the Color Center (see
Color profiling on page 61).
●
The HP Advanced Profiling Solution (supplied with your printer). For more information on the
HP Advanced Profiling Solution, see its own documentation and also
http://www.hp.com/go/
z3200/solutions/.
●
A third-party profiling program (see
Color measurement on page 63).
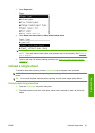
12. Once you have created and adjusted the ICC profile for your paper, you can link this profile to the
paper preset with the Color Center: select Paper Preset Management > Install Profile. If you
have used the standard Color Center profiling process, this step is not necessary because the
profile is linked automatically to the paper preset.
38 Chapter 4 Paper handling ENWW
Paper handling