


Change the drying time
You may wish to change the drying time setting to suit special printing conditions such as multiple prints
where time is of higher importance or when you need to be sure ink is dry before handling.
NOTE: Most paper types require no drying time.
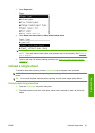
Select the Setup menu icon , then Print retrieval> Select drying time. You can select:
●
Extended, to set a longer than recommended time to ensure ink is completely dry
●
Optimal, to set the default and recommended time for your selected paper
●
Reduced, to set a shorter than recommended time when quality is of lower importance
●
None, to disable the drying time and remove your print as soon as it finishes printing
TIP: If the ink is not dry when the print is removed it could leave ink in the output tray and marks on
the print.
NOTE: If you cancel the drying time during a print, the printer may not feed and cut the paper right
away due to the printhead maintenance, which runs in parallel. If the dry time is zero, the printer cuts
the paper and then performs the printhead maintenance. However, if the dry time is greater than zero,
the printer does not cut the paper until after the printhead maintenance has completed, even if the Form
feed and cut key has been pressed.
Turn the automatic cutter on and off
To turn the printer's paper cutter on or off:
●
From the HP Printer Utility for Windows, select the Settings tab and change the Cutter option
in Printer Settings > Advanced.
●
From the HP Printer Utility for Mac OS, in the Configuration group, select Printer Settings >
Configure Printer Settings and change the Cutter option in Printer Settings > Advanced.
●
From the Embedded Web Server, select the Setup tab, then Printer Settings, and change the
Cutter option in Printer Settings > Advanced.
●
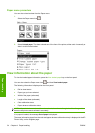
From the front panel, select the Setup menu icon
, and then Print retrieval > Enable cutter.
NOTE: To cut rolled paper while the automatic cutter is disabled, see Feed and cut the paper
on page 40.
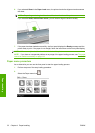
Feed and cut the paper
To feed and cut the paper when the automatic cutter has been disabled, or when the front edge of the
paper is not straight, press the Form feed and cut key on the front panel. The paper advances and a
message is displayed on the front panel:
Select the cutting position by pressing the arrow keys backward and forward
If you immediately press the OK key, the printer will make a straight cut removing a 4-inch strip from the
front edge of the paper.
Alternatively, you can use the Up and Down keys to remove more or less of the paper (minimum 2
inches). Open the window to see where the cut will be made, indicated by a scissors label at the side
of the carriage. The window can remain open while you are moving the paper. When you have finished
moving the paper, close the window and press the OK key.
40 Chapter 4 Paper handling ENWW
Paper handling