Selecting Photos for Printing 25
Selecting a Range of Photos
You can select a range of photos to print if you took a set of photos that you want to print out
at once.
If your printer doesn’t have the preview monitor, first print an index to identify the photos on
the memory card (as described on page 23).
1. Highlight
Select Photo, then press OK.
2. Highlight
Range, then press OK.
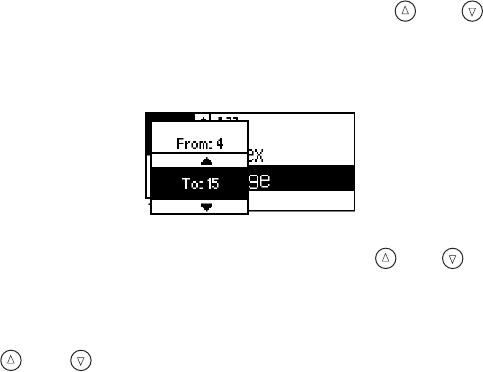
3. Choose a starting photo under the
From: option using the and buttons. (Hold
down either button to scroll quickly through the photo numbers.)
4. Press
OK.
5. Choose an ending photo under the
To: option using the and buttons.
6. Press
OK. The range appears on the right side of the LCD.
7. If you want to print more than one copy of this range, highlight
Copies and press OK,
then use the and buttons to select the desired number of copies and press
OK.
8. Continue with “Printing Your Selected Photos” on page 26 to finish laying out your
photos and setting up your print job.
Using DPOF or PictBridge to Select Your Photos
If your camera supports DPOF or PictBridge, you can use it to select photos for printing; see
your camera’s instruction manual for details. When you connect your camera or insert its
memory card,
DPOF or PictBridge automatically displays under the Select Photo menu.
Your photos and the number of copies you want to print are already selected.
To print, continue with “Printing Your Selected Photos” on page 26 to finish laying out your
photos and setting up your print job.
If you don’t want to use DPOF or PictBridge, you can turn it off by selecting photos from the
Select Photo menu, as described on pages 24 through 25.
Pbasics.book Page 25 Tuesday, June 1, 2004 1:31 PM


