


13
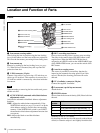
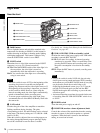
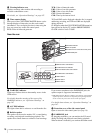
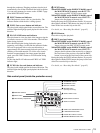
Location and Function of Parts
Chapter 1 Overview
iris function does not operate correctly, select an
appropriate position.
When this selector is used with the menu item for filter
selection display set to ON (see page 138), the new setting
appears on the viewfinder screen for about 3 seconds.
You can change a MAINTENANCE menu setting so that
different white balance settings can be stored for different
FILTER selector positions. This allows you to
automatically obtain optimum white balance for the
current shooting conditions in linkage with the filter
selection.
For details, see “To adjust the white balance” (page 55).
j ZEBRA button
Press to display a zebra pattern (diagonal stripes) in the
viewfinder screen.
The zebra pattern is factory set to indicate picture areas
where the video level is approximately 70%. However, on
the VF SETTING page of the OPERATION menu, you
can change the setting so that areas where the video level
is 100% and above are also indicated at the same time. In
addition, you can also change the video level for
displaying the zebra pattern in the range from 30% to
107%.
For details, see “Setting the Viewfinder Screen Display”
on page 139.
k ASSIGN switches
You can assign the desired functions to each of the EZ
MODE 1 and ASSIGN 2 switches on the ASSIGNABLE
page of the OPERATION menu.
The following functions are factory preset to the switches.
For details, see “Assigning Functions to ASSIGN
Switches” on page 143.
l Lens locking lever
After inserting the lens in the lens mount, rotate the lens
mount ring with this lever to lock the lens in position.
After locking the lens, be sure to use the lens mount
securing rubber to prevent the lens from becoming
detached.
m MENU knob
Changes the page selection or a setting within the menu.
For details about how to use the MENU knob, see “Basic
Menu Operations” on page 132.
n SHUTTER switch
Set to ON to use the electronic shutter. Flick to SEL to
switch the shutter speed or shutter mode setting within the
range previously set with the menu. When this switch is
operated, the new setting appears on the setting change/
adjustment progress message display area for about 3
seconds.
For details about the shutter speed and shutter mode
settings, see “Setting the Electronic Shutter” on page 57.
o AUDIO LEVEL knob
Adjusts the input level of audio channels 1and 2.
You can disable this knob by setting the AUDIO CH1
LEVEL and AUDIO CH2 LEVEL items on the AUDIO-1
page of the MAINTENANCE menu. (The knob is factory
preset so that it is enabled.)
Switch Function
ASSIGN 1/
EZ MODE
EZ MODE (EZ mode ON/OFF)
ASSIGN 2 No assignment (equivalent to an OFF
selection in the function assignment
menu)