


62
Recording – Basic Operations
Chapter 3 Recording and Playback
When the frame frequency of this unit is 23.98P, a
timecode frame count can only be set to a multiple of
4 (0, 4, 8, 12, 16, or 20).
6
Set the F-RUN/SET/R-RUN switch to the desired
operating mode for the timecode generator.
F-RUN: Free run. The timecode generator keeps
running.
R-RUN: Recording run. The timecode generator runs
only while recording.
To set the DF (drop-frame)/NDF (non-drop-frame)
mode
You can select the drop-frame (DF) mode or non-drop-
frame (NDF) mode on the TIME CODE page of the
MAINTENANCE menu.
When the frame frequency of this unit is 23.98P, recorded
timecode is always non-drop-frame (NDF).
To make the timecode consecutive
When the F-RUN/SET/R-RUN switch is set to R-RUN,
recording a number of scenes to the disc normally
produces consecutive timecode. However, once you
remove the disc and record to another disc, the timecode
will no longer be contiguous even when you use again the
original disc for recording.
In this case, by setting the PRESET/REGEN/CLOCK
switch to REGEN, the timecode can be made continuous.
To save the actual time in the timecode
Setting the PRESET/REGEN/CLOCK switch to CLOCK
saves the actual time in the timecode. When it is necessary
to set the actual time, use the TIME/DATE page of the
OPERATION menu.
For details, see “Setting the Date and Time of the Internal
Clock” on page 33.
When the frame frequency of this unit is 23.98P, the
recorded timecode does not coincide with real time.
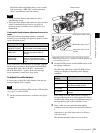
To set the user bits
By setting the user bits (up to 8 hexadecimal digits), you
can record user information such as the date, time, or scene
number on the timecode track.
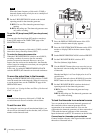
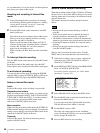
1
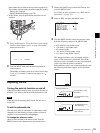
Press the DISPLAY/EXPAND button of the LCD
monitor so that the status display appears.
2
Press the COUNTER/CHAPTER button on the LCD
monitor to display UBG in the time counter display
section.
3
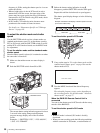
Set the PRESET/REGEN/CLOCK switch to PRESET.
4
Set the F-RUN/SET/R-RUN switch to SET.
The first (leftmost) digit flashes.
5
Use the SEL/SET button (four-way arrow key) to set
the timecode value including the last (rightmost) digit
of timecode.
Hexadecimal digits A to F are displayed as A to F in
capital letters.
To reset the timecode value to 00 00 00 00, press the
RESET button on the right side of the LCD monitor.
6
Set the F-RUN/SET/R-RUN switch to the desired
operating mode for the timecode generator.
F-RUN: Free run. The timecode generator keeps
running.
R-RUN: Recording run. The timecode generator runs
only while recording.
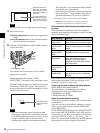
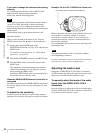
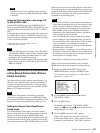
To lock the timecode to an external source
You can synchronize the internal timecode generator of
this camcorder with an external generator for the
regeneration of an external timecode. You can also
synchronize the timecode generators of other camcorders/
VTRs with the internal generator of this camcorder.
Input the timecode to the TC IN connector on the left side.
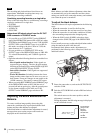
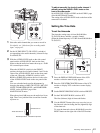
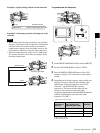
Connections for timecode synchronization
Connect both the reference video signal and the external
timecode as illustrated below.
Note
Note
Note
PRESET F-RUN
REGEN
SET
CLOCK R-RUN
SUB CLIP
CLIP MENU
SEL/SET
4
3,5
12