


77
Playback
Chapter 3 Recording and Playback
Deteriorating playback conditions
Deteriorating playback may be due to the following
causes.
• Scratches and dust on the disc surface
This includes fingerprints, dust from the air, tar from
cigarette smoke, and so on.
Scratches and soiling which occur before recording are
not a problem because they are registered in advance as
defects, and recording avoids them. However, scratches
and soiling which occur after recording can lead to
deteriorating playback conditions.
• Aging of disc recording layers
Over several decades, the recording layers of optical
discs can age and cause deteriorating playback
conditions.
• Deteriorating laser diodes performance
The performance of the laser diodes used in optical
heads can worsen with age, leading to deteriorating
playback conditions.
Refer to the Maintenance Manual for an approximate
guide to when it is time to replace optical heads.
To prevent playback conditions from
deteriorating
Pay attention to the following points when handling discs.
• Do not open disc cartridges and touch discs directly with
your hands.
• Do not store for long periods in locations which are
dusty or exposed to air circulated by fans.
• Do not store for long periods under high temperatures or
in locations exposed to direct sunlight.
If playback conditions have deteriorated
Read errors occur when playback conditions continue to
deteriorate.
When a read error occurs, the message “DISC DEFECT”
appears, the video freezes, and the audio output is
suppressed.
If this happens, check the following points.
Whether the disc displays the same playback condition
on other XDCAM devices: If so, the surface of the
disc may be dirty or scratched, or the performance of
the recording layers on the disc may have worsened
due to age. Do not use discs with these symptoms.
Whether every disc inserted into an XDCAM device
displays the same playback conditions: If so, the
performance of the laser diodes may have
deteriorated. Check the total optical output time.
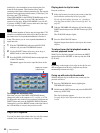
Freezing a Picture during Playback
Proceed as follows.
1
Press the PLAY/PAUSE button to start playback.
2
Press the PLAY/PAUSE button again at the instant
when you want to freeze the picture.
A frozen picture appears.
The time code is displayed in the time counter display
section and the PLAY/PAUSE indicator changes from
constant lighting to flashing (one flash/second).
3
To restart playback, press the PLAY/PAUSE button
once again.
When remotely controlling the camcorder from
an RM-B150/B750 Remote Control Unit
You can perform the same operation from the RM-B150/
B750.
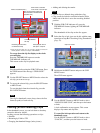
Checking the Last Two Seconds of
the Recording (Recording Review)
If you press the RET button on the lens while recording is
paused, the last two seconds of the recording are played
back on the viewfinder screen and the LCD monitor. Use
this function to check whether recording went smoothly. If
you hold down the RET button on the lens, playback
begins from the beginning of the clip. After playback, the
camcorder is ready to start recording again.
When the LENS RET function is assigned to one of the
ASSIGN 1/2/3/4 switches, you can use that switch in the
same way as the lens RET button.
When the Clip Continuous Rec function is enabled, the
review returns to the recording start point.
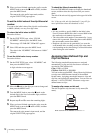
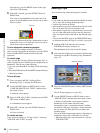
Checking the Recording on a Color
Video Monitor
Connect a color video monitor to the VIDEO OUT
connector or SDI OUT connector of the camcorder. By
pressing the PLAY/PAUSE button, you can view the
recorded picture.
On how to connect a color video monitor, see “Connecting
an External Video Monitor” on page 45.