


14
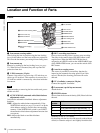
Location and Function of Parts
Chapter 1 Overview
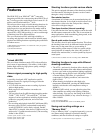
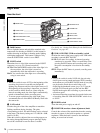
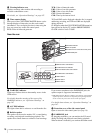
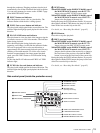
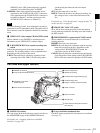
Right Side
Near the front
a 5600K button
Press to light the button and switch the standard color
temperature for shooting to 5600K. Use this button for
outdoor shooting in daytime or shooting under lighting
with higher temperature. This button is effective only
when the WHITE BAL switch is set to PRST.
b LIGHT switch
Determines how a video light connected to the LIGHT
connector (see page 22) is turned on and off.
AUTO: When the POWER switch of the video light is in
the on position, the video light is turned on
automatically while the camcorder is recording.
MAN: You can turn the video light on or off manually,
using its own switch.
• When this switch is set to AUTO, at the beginning of the
recording, the picture is recorded even though the
lighting may fluctuate until the video light comes on. If
the beginning of the recording is important, you should
set this switch to MAN. However, when using the
interval recording mode, the video light is automatically
turned on immediately before recording starts.
• To ensure proper operation of the video light, Sony
recommends the use of the BP-GL95 Battery Pack with
the camcorder.
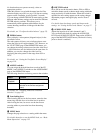
c GAIN switch
Switches the gain of the video amplifier to match the
lighting conditions during shooting. The gains
corresponding to the L, M, and H settings can be selected
in the menu. (The factory settings are L = 0 dB, M = 9 dB,
and H = 18 dB.)
When this switch is adjusted, the new setting appears on
the setting change/adjustment progress message display
area of the viewfinder screen for about 3 seconds.
For details, see “Setting Gain Values for the GAIN Switch
Positions” on page 141.
d VDR SAVE/STBY (VDR save/standby) switch
Switches the status of the power supply to the VDR while
recording is paused (REC PAUSE).
SAVE: At the start of recording, an internal operating
sound may be recorded. There is a small delay from
pressing the REC button until recording starts, since
the power consumption is less than in the standby
state.
STBY: When the REC button is pressed, recording starts
immediately.
• Even if the switch is on the SAVE side, the unit exits
SAVE (power saving) mode and enters STBY (standby)
mode whenever you exit REC PAUSE mode by carrying
out playback to check the recorded video or by
displaying the thumbnail screen (page 78). To put the
unit into SAVE mode again, put the unit into REC
PAUSE mode again after recording, or power the unit
off and on again.
• An internal operating sound may be recorded at the start
of recording when the VDR SAVE/STBY switch is set
to SAVE.
e POWER switch
Turns the main power supply on and off.
f MONITOR (monitor volume adjustment) knob
Controls the volume of the sound other than the warning
tone that is output via the built-in speaker or optional
earphones. When the knob is turned to the minimum
setting, no sound can be heard.
qa OUTPUT/DCC switch
1 5600K button
3 GAIN switch
6 MONITOR knob
7 ALARM knob
2 LIGHT switch
5 POWER switch
8 LCD monitor
9 MENU switch
0 WHITE BAL switch
4 VDR SAVE/STBY switch
Notes
Notes