


67
Recording – Advanced Operations
Chapter 3 Recording and Playback
Recording – Advanced
Operations
Time-lapse Video Recording
(Interval Rec Function)
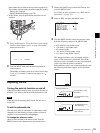
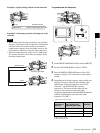
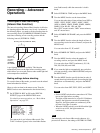
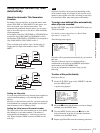
The interval recording (Interval Rec) function is effective
for shooting objects that move very slowly. As shown in
the following figure, you need to set the recording time for
one recording session (NUMBER OF FRAME) and the
total time consisting of one recording session and the
following interval (INTERVAL TIME).
A pre-lighting function is available. This function
automatically turns on the light before recording starts,
which allows you to record pictures under stable light and
color temperature conditions.
Making settings before shooting
To record in Interval Rec mode, you need to set the related
items beforehand as follows.
(How to select an item in the menu screen: Turn the
MENU knob to move the b mark to the desired item.)
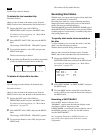
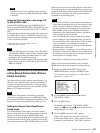
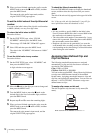
1
Set INTERVAL REC to ON on the SPECIAL
EFFECTS page of the OPERATION menu.
For details on menu operations, see “Basic Menu
Operations” on page 132.
The camcorder is put in Interval Rec mode. The
TALLY indicator (green) in the viewfinder flashes
(one flash/second) while the camcorder is in this
mode.
2
Select INTERVAL TIME, and press the MENU knob.
3
Turn the MENU knob to set the interval time.
You can select the value of interval time from 1SEC to
10SEC, 15SEC, 20SEC, 30SEC, 40SEC, 50SEC,
1MIN to 10MIN, 15MIN, 20MIN, 30MIN, 40MIN,
50MIN, 1H to 4H, 6H, 12H, and 24H.
Here “SEC” means seconds, “MIN” means minutes,
and “H” means hours.
4
Select NUMBER OF FRAME, and press the MENU
knob.
5
Turn the MENU knob to select the length of time of
one recording session in units of frames, and press the
MENU knob.
You can select from 1F, 3F, and 6F.
6
Select NUMBER OF TIMES, and press the MENU
knob.
7
Turn the MENU knob to select the number of
recording sessions, and press the MENU knob.
You can select from CONT (continuous), 50, 100,
200, 300, 500, 800, and 1000.
8
If you want the light to automatically turn on before
you start recording, select PRE-LIGHTING and press
the MENU knob.
9
Turn the MENU knob to specify the time in units of
second (how long before the start of recording the light
should turn on automatically), and press the MENU
knob.
You can select from OFF, 2SEC, 5SEC, and 10SEC.
• Set the LIGHT switch on the camcorder to AUTO to
turn on the light before recording.
The light switch must also be set to ON. With these
settings, the light turns on and off automatically.
However, the light remains on continuously if the
off time is less than 5 seconds.
• When the LIGHT switch is set to MAN and the light
switch is set to ON, the light remains on
continuously.
The camcorder exits Interval Rec mode whenever it is
powered off. However, the settings of INTERVAL TIME,
Shooting interval (INTERVAL TIME)
Recording
time for one
recording
session
(NUMBER
OF FRAME)
002 SPECIAL EFFECTS TOP
SLOW&QUICK : OFF
FRAME RATE : 30P
CLIP CONT REC : OFF
INTERVAL REC : ON
INTERVAL TIME : 1SEC
NUMBER OF FRAME : 1F
NUMBER OF TIMES : CONT
PRE-LIGHTING : OFF
PICTURE CACHE : OFF
CACHE REC TIME : 8-10s
Notes
Note