


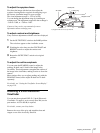

36
Adjusting the Viewfinder
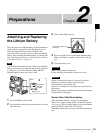
Chapter 2 Preparations
Adjusting the Viewfinder
Depending on the eyesight of the operator — whether
longsighted or shortsighted — the optimal position of the
viewfinder image varies. Adjusting brightness, contrast,
and so on, improves the visibility of the viewfinder screen.
Although these adjustments may make the viewfinder
image clearer, they have no effect on the output video
signal from the camcorder.
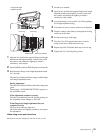
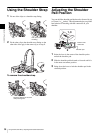
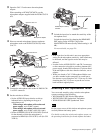
Detaching the Viewfinder
Remove any microphone from the viewfinder beforehand.
1
Power off this unit, then unplug the viewfinder
connector from the VF connector.
2
Loosen the viewfinder left-to-right positioning ring
1, and with the stopper raised 2, detach the
viewfinder 3.
To attach the viewfinder
Reverse the detaching procedure. (Note that it is not
necessary to raise the stopper.)
Note the following points when mounting the viewfinder.
• Be sure to power off this unit before plugging the
viewfinder connector into the VF connector on this unit.
If the connector is plugged in while the power is on, the
viewfinder may not operate correctly.
• Make sure that the viewfinder connector is pushed fully
into the VF connector on the unit. If the connector is not
firmly connected, the image may break up, or the tally
light may not operate properly.
For details, contact your Sony dealer.
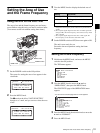
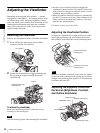
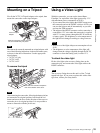
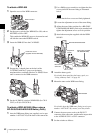
Adjusting the Viewfinder Position
To adjust the viewfinder left-to-right position, loosen the
left-to-right positioning ring, and to adjust the front-to-
back position, loosen the front-to-back positioning knob.
When the viewfinder is attached, do not leave the camera
(or the camcorder) with the eyepiece facing the sun. Direct
sunlight can enter through the eyepiece, be focused in the
viewfinder and cause fire.
Adjusting the Eyepiece Focus and
the Screen (Brightness, Contrast,
and Outline Emphasis)
Note
VF connector
2
3
1
Viewfinder left-to-right
positioning ring
Stopper
Note
Viewfinder left-to-right
positioning ring
Viewfinder front-to-back
positioning knob
Eyepiece focusing ring
BRIGHT control
CONTRAST control
OUTPUT/DCC switch
PEAKING control