


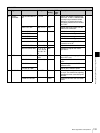


139
Setting the Status Display on the Viewfinder Screen and the LCD Monitor
Chapter 5 Menu Displays and Detailed Settings
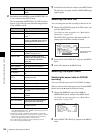
Setting the Viewfinder Screen
Display
You can make settings for viewfinder screen display
functions.
(How to select an item in the menu screen: Turn the
MENU knob to move the b mark to the desired item.)
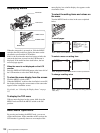
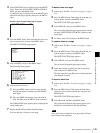
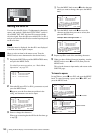
1
Display the VF SETTING page of the USER
(OPERATION) menu, and press the MENU knob.
For details on menu operations, see “Basic Menu
Operations” on page 132.
2
Select the desired setting item, and press the MENU
knob.
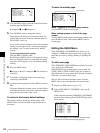
You can set the following items on the VF SETTING
page.
1) When you use the viewfinder which is not equipped with a ZEBRA
switch, turns the display on or off using this item. When you use the
viewfinder with a ZEBRA switch, the switch operation and the
operation of this menu are both effective (the most recent operation
prevails).
2) When the VF ASPECT item is set to AUTO, this is linked to the
setting of the “ASPECT RATIO (DV)” item on the FORMAT page.
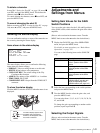
3
Turn the MENU knob to select the desired setting, and
press the MENU knob.
4
Repeat steps 2 and 3 until you have set all of the
desired items.
Recording Shot Data Superimposed
on the Color Bars
You can select which shot data is recorded superimposed
on the color bars. You can also select which of the shot IDs
(1 to 4) set on the SHOT ID page is recorded superimposed
on the picture.
(How to select an item in the menu screen: Turn the
MENU knob to move the b mark to the desired item.)
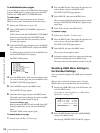
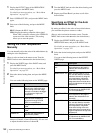
1
Display the SHOT DISP page of the OPERATION
menu, and press the MENU knob.
For details on menu operations, see “Basic Menu
Operations” on page 132.
2
Select the desired setting item, and press the MENU
knob.
You can set the following items on the SHOT DISP
page.
3
Turn the MENU knob to select the desired setting
(ON, OFF, or value), and press the MENU knob.
4
Repeat steps 2 and 3 until you have set all of the
desired items.
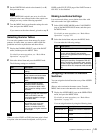
To carry out superimposed recording
To actually record the items selected for superimposed
recording on the SHOT DISP page, set the OUTPUT/DCC
switch to BARS, DCC OFF. The items selected for
superimposed recording appear on the screen and are
recorded superimposed on the color bars.
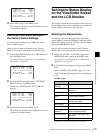
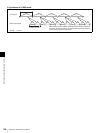
(Display example: shows case where SHOT DATE is
ON.)
Item Description
ZEBRA Turns the zebra display ON or
OFF.
1)
ZEBRA SELECT Selects ZEBRA 1, ZEBRA 2 or
BOTH.
ZEBRA 1 DET. LVL Adjusts the level of the ZEBRA 1
display (30% to 107%). (Factory
default setting is 70%.)
PEAKING
VOL.LINK
For viewfinder image adjustments
made with the PEAKING control,
switches between linkage (ON)
and no linkage (OFF) of peaking
adjustment and detail level
adjustment.
H DETAIL LEVEL Adjusts the H detail of the
viewfinder image.
V DETAIL LEVEL Adjusts the V detail of the
viewfinder image.
DETAIL FREQ Turns the VF detail function on or
off and adjusts the frequency.
(NORM/HIGH)
VF ASPECT Selects the viewfinder aspect ratio
(AUTO/4:3).
2)
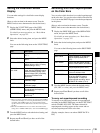
Item Description
SHOT DATE Selects whether or not the shot
data is superimposed (ON or
OFF).
DATE MODE Selects the date display format.
(One of Y/M/D, M/D/Y, and D/M/Y)
SHOT TIME Selects whether or not shot time
is superimposed (ON or OFF).
TIME MODE Switching time indications to the
12-hour or 24-hour clock
SHOT ID SEL Selects whether or not the shot ID
set on the SHOT ID page is
superimposed. To carry out
superimposed recording, select
the SHOT ID number (1 to 4).