


89
Creating Clip Lists
Chapter 4 Scene Selection
Creating Clip Lists
Including Sub Clips in the Current
Clip List
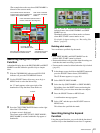
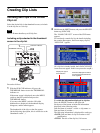
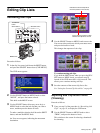
Select the desired clip in the thumbnail screen, to include
it in the clip list as a sub clip.
The CLIP menu handles up to 99 clip lists.
Including a clip selected in the thumbnail
screen in the clip list
Proceed as follows.
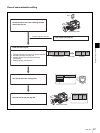
1
With the SUB CLIP indicator off, press the
THUMBNAIL button to turn the THUMBNAIL
indicator on.
If the menu screen is displayed, move the MENU
switch to the OFF position and press the
THUMBNAIL button.
If you move the MENU switch to ON while
thumbnails are displayed, the thumbnail display
disappears, and the menu appears.
The thumbnails of the clips on the disc appear.
(In the following description, this is referred to as the
“thumbnail screen”. )
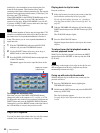
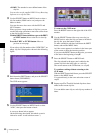
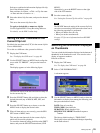
2
Hold down the SHIFT button, and press the SEL/SET
button up (SUB CLIP).
The “LOAD CLIP LIST” screen of the CLIP menu
appears.
For an already created clip list, the details including
the creation date appear, and for an empty clip list,
“NEW FILE” appears.
(If a clip list is already loaded, the LOAD CLIP LIST
screen does not appear. In this case proceed to step 4.)
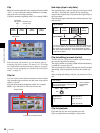
To switch the information displayed in clip lists
Press the SEL/SET button to the right side.
Each press of the button switches the information
displayed in the following order.
Date and time of creation
t title t clip name t
Date and time of creation....
The following information is displayed for each type.
+DATE: Date and time of clip list creation or last
modification
+TITLE: The title of the clip list, if it has one
Note
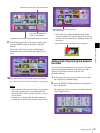
CH-1
MIX
CH-2
CH-3
PRESET
AUTO
FRONT
WIRELESS
REAR
CH-1
MANUAL
AUDIO SELECT
AUDIO IN
F-RUN
REGEN
ON
OFF
SET
ON
OFF
CLOCK
F
W
R
F
W
R
R-RUN
MONITOR
FRONT MIC
LOW CUT
VIDEO OUT
CHARACTER
AUDIO LEVEL
THUMBNAIL SUB CLIP
MIX
CH-4
CH-1/2
CH-3/4
SHIFT
CLIP MENU
SEL/SET
010010
ESSENCE
MARK
CH-2
CH-3
CH-4
LITHIUM BATT
2-9
1
3,5-8
SUB CLIP indicator
THUMBNAIL indicator
Displays the type of
the information
Switch the displayed information
by pressing the SEL/SET button
to the right side