


144
Adjustments and Settings from Menus
Chapter 5 Menu Displays and Detailed Settings
2
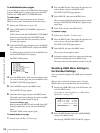
Select the desired ASSIGN switch (ASSIGN SW <1>
to <4>), and press the MENU knob.
The corresponding ASSIGN SW (1 to 4) SEL window
appears. You can assign one of the following functions
to the ASSIGN switch.
a) Even when the MARKER item is set to OFF on the MARKER page
of the OPERATION menu, the ASSIGN switches allow you to turn
the display of all markers on or off.
b) Function assignable to ASSIGN 1 and ASSIGN 2 switches only
c) Abbreviation for Total Level Control System. A function to operate
the automatic gain control (AGC) and electronic shutter (AE) to
adapt to varying lighting conditions while shooting.
d) Use when shooting a subject at which a spotlight is directed.
e) Use when shooting a backlit subject.
3
Select the desired function, and press the MENU knob.
The function is assigned, and the ASSIGNABLE page
appears again.
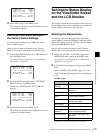
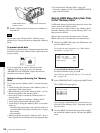
Selecting the Lens File
You can change the lens file according to the lens in use.
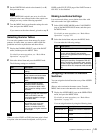
1
Display the LENS FILE page of the FILE menu, and
press the MENU knob.
For details on menu operations, see “Basic Menu
Operations” on page 132.
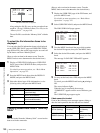
The LENS FILE page shows the name and the iris
setting value of the lens currently selected.
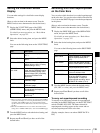
2
Select LENS AUTO RECALL, and press the MENU
knob.
3
Select ON, and press the MENU knob.
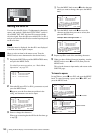
Selecting the Aspect Ratio
Switching the aspect ratio for DVCAM
recording
You can switch the aspect ratio for DVCAM recording.
(How to select an item in the page screen: Turn the MENU
knob to move the b mark to the desired item.)
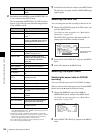
1
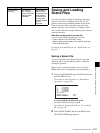
Display the FORMAT page of the USER (or
OPERATION) menu, and press the MENU knob.
For details on menu operations, see “Basic Menu
Operations” on page 132.
2
Select ASPECT RATIO (DV), and press the MENU
knob.
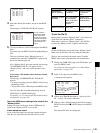
ASSIGN SW <4> Assigns the function to ASSIGN 4
switch.
Function Description
OFF Assign no function.
MARKER Turn the display of all markers on
or off.
a)
RETAKE Delete the last recorded clip. (This
function is disabled when the Clip
Continuous Rec function is on.)
ATW Turn ATW on or off.
LENS RET Use the recording review function.
REC SWITCH Start/stop recording.
TURBO SWITCH Use the gain value set for GAIN
TURBO (see page 141).
FREEZE MIX Output the freeze image and
camera input alternately, to allow
frame alignment (automatic
switching).
SHOT MARK1 Use the shot mark1 function.
SHOT MARK2 Use the shot mark2 function.
EZ MODE
b)
Turn EZ mode on or off.
EZ FOCUS
b)
Turn the EZ focus function on or
off.
SKIN DETAIL ON/
OFF
b)
Turn the skin detail adjustment
function on or off.
SPOT LIGHT
b)
Use auto iris spotlight mode
d)
BACK LIGHT
b)
Use auto iris backlight mode
e)
TLCS
b), c)
Enter or exit TLCS mode.
PICTURE CACHE Turn the Picture Cache function
on or off.
AWB Execute the auto white balance
function.
SHUTTER SW Turn the shutter on or off.
SHUTTER MODE Execute shutter mode switching
and shutter speed switching.
CLIP CONT REC Turn the Clip Continuous Rec
function on or off.
Item Description
TOP F04 LENS FILE 1
LENS FILE RECALL: EXEC
LENS FILE STORE : EXEC
F.ID [C]VCL-719BXS
SOURCE : --------
LENS NO OFFSET : EXEC
IRIS GAIN :
LENS AUTO RECALL: ON
<LENS INFORMATION>
L.ID: VCL-719BXS
L.MF: Cannon
Lens file number
Lens name and iris
setting value
TOP 001 FORMAT
SYSTEM : 60I
REC FORMAT : DVCAM
23.9P OUTPUT : PD
BIT RATE (HD) : SP
AUDIO CH (HD) : 4ch
ASPECT RATIO(DV): 16:9
COUNTRY : NTSC(J)AREA