


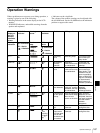


171
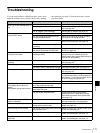
Troubleshooting
Appendix
Troubleshooting
You can use this chart to establish possible causes of an
apparent problem; always double-check before sending
the camcorder for repair. If a problem persists, contact
your Sony dealer.
Symptoms Cause Remedy
The camcorder does not power on
when you set the POWER switch to
ON.
There is no battery pack attached. Attach a battery pack (see page 30).
The battery pack is exhausted. Replace the battery pack with a fully charged
one (see page 30).
The AC adaptor is not connected. Connect the AC adaptor (see page 30).
Recording does not start when you
press the REC button.
The POWER switch is set to OFF. Set the POWER switch to ON.
The disc has the Write Inhibit tab in the
recording disabled position.
Set the Write Inhibit tab to allow recording
(see page 48), or change the disc.
The disc is full. Replace the disc with one with sufficient free
space, or format the disc (see page 49).
The inserted disc requires salvage
processing.
Carry out salvage processing (see page 50).
The recording format setting is different
from that of the already recorded clips.
Change the disc, or change the recording
format (see page 53).
Playback does not start when you
press the PLAY button.
The unit is stopped at the position after
recording finished.
Press the PREV button to move to the first
frame of a clip, or hold down the PLAY/
PAUSE button and press the PREV button to
move to any other position.
The power supply cuts while
operating.
The battery pack is exhausted. Replace the battery pack with a fully charged
one (see page 30).
The battery goes dead very quickly. The operating temperature is very low. Use a BP-GL95 (see page 30).
The battery pack is inadequately charged. Recharge the battery pack (see page 30).
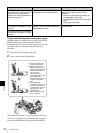
It is not possible to eject the disc. The battery pack is exhausted. Replace the battery pack with a fully charged
one (see page 30).
If the battery cannot be charged, or there is
no replacement battery, use the procedure in
the next item, “To eject the disc when there is
no power supply” to eject the disc.
The POWER switch is set to OFF. Set the POWER switch to ON.
The playback picture quality is poor.
The playback picture does not
appear.
The playback sound does not hear.
The disc surface is scratched, or there is
dirt or dust adhering to the disc.
Replace the disc.
The recording surface of the disc has
deteriorated over time.
The laser diode has deteriorated. On the HOURS METER page of the
DIAGNOSIS menu, check the cumulative
light output parameters of the optical head
(see page 127).
All controls except the EJECT
button are disabled.
There is condensation. Remove the disc and wait with the power on
until the condensation has evaporated.
Audio recording is not possible. The AUDIO LEVEL (CH-1/CH-2) knobs
are set to the minimum level.
Adjust the setting of the AUDIO LEVEL
knobs (see page 13).
Audio recording is not possible. The AUDIO LEVEL knob on the front is set
to the minimum level.
Adjust the setting of the AUDIO LEVEL knob
on the front (see page 19).
The recorded sound is distorted. The audio level is too high. Adjust the setting of the AUDIO LEVEL
knobs, and record again (see page 19).
The recorded sound has a high
noise level.
The audio level is too low. Adjust the setting of the AUDIO LEVEL
knobs, and record again (see page 19).