


20
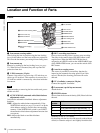
Location and Function of Parts
Chapter 1 Overview
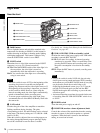
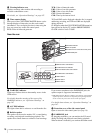
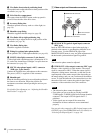
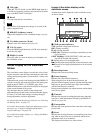
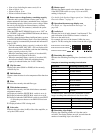
a MONITOR (audio monitor selection) switches
By means of combinations of the two switches, you can
select audio that you want to hear through the built-in
speaker or optional earphones.
a) By connecting stereo headphones to the EARPHONE connector you can
hear the audio in stereo. (On the AUDIO-2 page of the MAINTENANCE
menu, HEADPHONE OUT must be set to “STEREO”.)
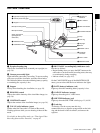
b SHIFT button
Use this in combination with other buttons.
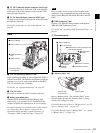
c Lithium battery compartment
Attach the supplied CR2032 lithium battery.
Details on how to attach the lithium battery, see
“Attaching and Replacing the Lithium Battery” on
page 29.
d THUMBNAIL indicator
This lights when thumbnails are displayed.
e THUMBNAIL button
Press this button to carry out a thumbnail search or create
a clip list.
When pressed, the whole-screen display changes to a
thumbnail display. Press once more to return to the whole-
screen display.
For a thumbnail search using essence marks, hold down
the SHIFT button and press this button.
f SUB CLIP indicator
This lights when using a clip list for playback.
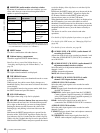
g SEL/SET (select/set) button (four-way arrow key)
Sets the timecode and user bits. Push the button towards
left or right so that the digit you want to change flashes.
Pushing the button upward increases the value of the
flashing digit, and pushing it downward decreases the
value.
Hold down the SHIFT button and press upward (in the
direction of the “SUB CLIP” legend) to display the clip
lists (when no clip list is loaded into the current clip list).
When a clip list is loaded, that clip list can be played back.
Hold down the SHIFT button and press upward once more
to exit the display of the clip lists or to exit the clip list
playback state.
Hold down the SHIFT button and press downward (in the
direction of the “CLIP MENU” legend) to display the
CLIP menu. Hold down the SHIFT button and press
downward once more to exit the CLIP menu.
When thumbnails (index frames of clips) are displayed on
the LCD monitor, you can use this button to select a
thumbnail. Push the button in four directions to move the
cursor up, down, left and right. After selecting the desired
thumbnail with the cursor, press the button centrally to
confirm.
This button is used for scene selection and other
operations.
For details of clip list playback operations, see page 82.
For details of the CLIP menu, see “Managing Clip Lists”
(page 96).
For details of scene selection, see page 86.
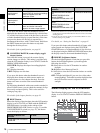
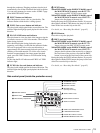
h AUDIO LEVEL (CH-1/CH-2) (audio channel 1/2
recording level) knobs
Adjusts the audio levels to be recorded on channels 1 and
2 when the AUDIO SELECT (CH-1/CH-2) switches are
set to MANUAL.
i AUDIO SELECT (CH-1/CH-2) (audio channel 1/2
adjustment method selection) switches
Select the audio level adjustment method for each of audio
channels 1 and 2.
AUTO: Automatic adjustment
MANUAL: Manual adjustment
j AUDIO IN (CH-1/CH-2/CH-3/CH-4) (audio
channel 1/2/3/4 input selection) switches
AUDIO IN CH-1/CH-2 switches
Select the audio input signals to be recorded on audio
channels 1 and 2.
FRONT: Input signals from the microphone connected to
the MIC IN connector
WIRELESS: Audio input signals from the CA-WR855
Camera Adaptor (supplied separately) if a WRR-855
series UHF synthesized tuner (supplied separately) is
installed using the CA-WR855
REAR: Audio input signals from an audio device
connected to the AUDIO IN CH-1/CH-2 connectors
AUDIO IN CH-3/CH-4 switches
Select the audio input signals to be recorded on audio
channels 3 and 4.
F (FRONT): Input signals from a microphone connected
to the MIC IN connector
W (WIRELESS): Audio input signals from the CA-
WR855 camera adaptor (supplied separately) if a
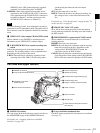
Position of left-
side switch
Position of right-
side switch
Audio output
CH-1/CH-3 CH-1/2 Channel 1 audio
MIX Channels 1 and 2
mixed audio
(stereo)
a)
CH-2/CH-4 Channel 2 audio
CH-1/CH-3 CH-3/4 Channel 3 audio
MIX Channels 3 and 4
mixed audio
(stereo)
a)
CH-2/CH-4 Channel 4 audio