


68
Recording – Advanced Operations
Chapter 3 Recording and Playback
etc. are maintained. You do not need to set them again the
next time you use Interval Rec mode.
Shooting and recording in Interval Rec
mode
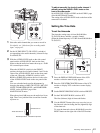
1
After performing the basic procedures for shooting
and recording, following the instructions in “Making
settings before shooting” on page 67, secure the
camcorder so that it will not move.
2
Press the REC button on the camcorder or the REC
button on the lens.
The camcorder starts recording in Interval Rec mode.
When you use the pre-lighting function, recording
starts after the light is switched on.
While recording in Interval Rec mode, the TALLY
indicator (green) in the viewfinder flashes (4 flashes/
second), and “INTERVAL” and other characters
appear on the viewfinder screen.
While recording, the REC indicator in the viewfinder
lights.
To interrupt interval recording
Press the REC button on the camcorder or the REC button
on the lens.
Recording in Interval Rec mode stops. Press the REC
button again to start recording in Interval Rec mode again.
To end interval recording
You can exit Interval Rec mode by setting the POWER
switch to OFF or setting INTERVAL REC to OFF on the
SPECIAL EFFECTS page of the OPERATION menu.
Notes on Interval Rec mode
Audio
In Interval Rec mode, audio recording is not possible.
Playback control buttons
While recording in Interval Rec mode, you cannot use the
playback control buttons (EJECT, F REV, PLAY/PAUSE,
F FWD, PREV, STOP and NEXT). To use these buttons,
stop recording by pressing the REC button on the
camcorder or the REC button on the lens.
Menu operation
While recording in the Interval Rec mode, the INTERVAL
TIME and other settings cannot be changed. To change the
settings, stop recording by pressing the REC button on the
camcorder or the REC button on the lens.
Timecode
In Interval Rec mode, the internal timecode generator
operates in R-RUN mode.
Slow & Quick Motion Shooting
When the recording format is 30P or 23.98P (or 25P when
the area of use is set to PAL AREA), then you can set the
shooting frame rate for recording to be different from the
playback frame rate.
This enables smooth slow motion and quick motion
effects.
• During slow & quick motion shooting, no audio is
recorded.
• When slow & quick motion is enabled, the interval
recording function is automatically switched off.
• The Picture Cache function is turned off automatically
whenever you turn the slow & quick motion function on.
• Switching EZ mode on disables slow & quick motion
shooting.
• During slow & quick motion shooting, timecode is
recorded in R-RUN mode.
(How to select an item in the menu screen: Turn the
MENU knob to move the b mark to the desired item.)
1
Check that recording is not in progress, and that the
operating mode is 30P (25P when PAL AREA is
selected) or 23.98P mode.
2
On the SPECIAL EFFECTS page of the OPERATION
menu, set SLOW & QUICK to ON.
For details of menu operations, see “Basic Menu
Operations” on page 132.
3
Select FRAME RATE, and press the MENU knob.
4
Turn the MENU knob to select the desired frame rate,
and press the MENU knob.
You can select from 4P to 30P and 60P (from 4P to
25P and 50P when PAL AREA is selected).
5
Set the MENU switch to OFF.
The frame rate setting appears on the viewfinder
screen. Watching this display, you can use the MENU
knob to change the frame rate.
6
Press the REC button to start recording.
Notes
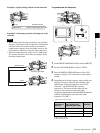
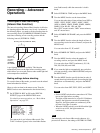
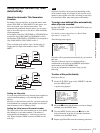
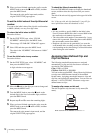
002 SPECIAL EFFECTS TOP
SLOW&QUICK : ON
FRAME RATE : 30P
CLIP CONT REC : OFF
INTERVAL REC : OFF
INTERVAL TIME : 1SEC
NUMBER OF FRAME : 1F
NUMBER OF TIMES : CONT
PRE-LIGHTING : OFF
PICTURE CACHE : OFF
CACHE REC TIME : 8-10s