


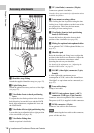


Locations and Functions of Parts and Controls
17
Chapter 1 Overview
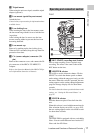
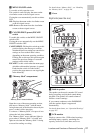
o Tripod mount
When using the unit on a tripod, attach the tripod
adaptor (optional).
p Lens mount (special bayonet mount)
Attach the lens.
Consult a Sony representative for information about
available lenses.
q Lens locking lever
After inserting the lens in the lens mount, rotate
the lens mount ring with this lever to lock the lens
in position.
After locking the lens, be sure to use the lens
mount securing rubber to prevent the lens from
becoming detached.
r Lens mount cap
Remove by pushing up the lens locking lever.
When no lens is mounted, keep this cap fitted for
protection from dust.
s CA (camera adapter) connector (50-
pin)
Remove the connector cover, and connect the 50-
pin connector of the HDCA-702 MPEG TS
Adaptor.
Refer to the Operation Manual of the HDCA-702 for
more information about how to mount it.
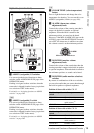
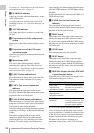
Front
a REC START (recording start) button
Press to start recording. Press it again to stop
recording. The effect is the same as that of the
REC button on the lens.
b SHUTTER selector
Set to ON to use the electronic shutter. Flick to
SELECT to switch the shutter speed or shutter
mode setting within the range previously set with
the menu. When this switch is operated, the new
setting appears on the setting change/adjustment
progress message display area for about three
seconds.
For details about the shutter speed and shutter mode
settings, see “Setting the Electronic Shutter” on
page 65.
c FILTER selector
Switches between optical filters built into this
unit.
When this selector is used with the menu item for
filter selection display set to ON (see page 202),
the new setting appears on the viewfinder screen
for about three seconds.
[F800]
The PDW-F800 is equipped with two switchable
filters. You can switch between four electrical CC
filters and four ND filters.
Operating and connectors section
2
1
7
5
6
3
4