


Microsoft Picture It! Companion Guide
73
Chapter 5: Basic Touchup
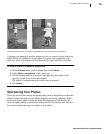
Cropping a photo allows you to eliminate distractions and improve the composition.
Cropping your photo to a specific proportion lets you control exactly where the
photo will be cut. Otherwise, if your photo is not the same proportion as the
print size, more of the photo will be automatically removed when you print it.
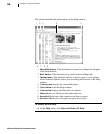
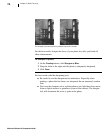
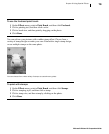
To crop a photo to a specific proportion:
1 On the Format menu, point to Crop, then click Canvas.
2 Under Select a proportion, click a print size.
3 Click a starting point on your photo, and then drag the outline to the
opposite corner of the area to be cropped.
The outline is proportional to the print size you selected.
4 Click Done.
Sharpening Your Photos
There are several times during the photography process that photos can become
blurred: while taking the picture, during printing, and during scanning. While
excessively blurry photos cannot be saved, the sharpen tool can improve the
focus of slightly blurry or moderately blurry photos. The sharpen tool increases
the contrast around the edges of objects in your photo.