


Microsoft Picture It! Companion Guide
85
8 Adding Edges, Mats, and Frames
When you’ve finished editing a photo, you can add polishing touches by
surrounding it with an edge, a border, a mat, or a frame.
Edge Effects
Edge effects alter the outside edge of a photo. For portrait photos, try the soft
edge effect. To draw attention to photos that you post on a Web site, try
applying one of the highlighted edges.
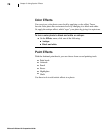
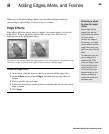
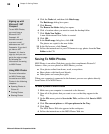
The photo on the left has highlighted edges applied, which works great for using photos on the
Web and in e-mail. The photo on the right has been enhanced with soft edges.
To add an edge effect:
1 In the Stack, click the layer to which you want to add the edge effect.
2 On the Effects menu, point to Edges, and then click an edge effect or
border.
3 Click a specific edge or border.
4 Follow the instructions on the screen to customize the size or color of the
edge or border.
5 Click Done.
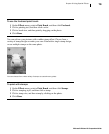
Shrinking a photo
to show the edge
effect
Some edge effects
appear only behind
and outside the photo.
So if your photo
reaches the edge of
the canvas, you might
not be able to see the
edge effect when you
print it or save it to the
Web.
To make sure you can
see an edge you’ve
added, press CTRL
while you drag in one
of the photo’s corner
resize handles. This
will shrink the photo
proportionally on the
canvas, so that the
border lies within the
printable area.