ERASING DATA
5
Press the SET button.
œ The Erase Confirmation Screen appears.
œ If “ONE ERASE” has been selected, you can press [d] or
[c] to select the data to erase.
6
Press [j] on the arrow button to select “YES”.
YES: Erases the selected data.
EXIT: Does not erase the selected data and returns to
the Erase Screen.
7
Press the SET button.
œ “ERASING” is displayed while the data is erased.
œ If you try to erase a protected image, “PROTECTED” will
appear and you return to the Erase Confirmation Screen.
The data is not erased. To erase the data, you must first
cancel the protect mode (see page 115).
œ To erase other data, press [d] or [c] to display the data
that you want to erase and repeat steps 6 and 7.
œ If all data is erased, then “NO IMAGE” or “NO AUDIO”
will appear.
When you have finished erasing data, turn off the digital camera.
NOTE
œ Even if you select “GROUP ERASE”, protected data will not be erased. If you want it to be
erased, you need to first remove the protection (see page 115).
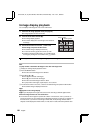
ERASE
ONE ERASE?
YES
EXIT
ERASE
ONE ERASE?
YES
EXIT
0
3
1
0
NO IMAGE
Displays the number of
remaining still images,
sequential shots, video clips,
and audio recordings.
SX511/EX, /E, /U (VPC-AZ1EX, VPC-AZ1E, VPC-AZ1 GB) Thu. Nov., 29/2001
117
English