3
Press [j] or [l] on the arrow button to select æ, and
press the SET button.
œ Recording begins. Point the microphone toward the
sound you wish to record.
œ For more information on the maximum recording time,
see page 136.
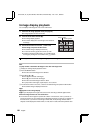
œ “RECORDING” and K appears during recording.
œ To stop the sound recording, press the SET button again.
œ When the recording time available for sound is
approximately less than 30 seconds, the remaining
recording time is shown.
œ To return to the Shooting Option Setting Screen, press
the MODE button, or select the C icon and press the
SET button.
Recording screen
When you have finish making the audio recording, turn off the digital camera.
HINT
To perform audio recording even after you exit the Audio Recording Screen
œ After displaying the Audio Recording Screen (perform steps 1 and 2 on page 79) and æ is
selected, you can set the main switch to “MONITOR OFF” and put the digital camera into the
audio recording stand-by state. In this state, just press the SET button to start recording.
AUDIO REC 08:12
7
RECORDING
STOP
Recording time
(min:sec.)
Remaining recording
time (sec)
Microphone
SX511/EX, /E, /U (VPC-AZ1EX, VPC-AZ1E, VPC-AZ1 GB) Thu. Nov., 29/2001
English
80