


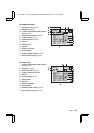


SETTING THE DATE AND TIME
4
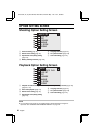
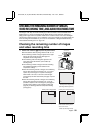
Set the date.
1 Press [l] to select the Û icon.
2 Turn the jog dial and press the arrow button to set the date
to “2002/8/28”.
œ Year setting Ö [c] Ö Month setting Ö [c] Ö Day setting.
œ Turn clockwise to increase the number.
œ Turn counterclockwise to decrease the number.
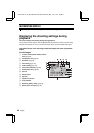
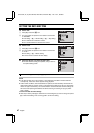
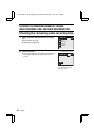
5
Set the clock.
1 Press [l] to select the À icon.
2 Turn the jog dial and press the arrow button to set the time
to “19:30”.
œ Hour setting Ö [c] Ö Minute setting.
œ A 24-hour clock is used for the time display.
6
Select the C icon, and press the SET button.
œ The date and time setting is completed, and you return to
the Option Setting screen.
Turn off the digital camera (see page 30).
NOTE
œ If the date and time are not set, October 1, 2001 midnight is recorded as the date and time.
Consequently, “2001/10/01 00:00” appears during playback.
œ Under normal conditions, while the batteries are replaced, an internal battery will maintain the
date and time settings. However, there is a small chance the settings may be lost. (The backup
will last for approx. 30 minutes.) It is recommended to check that the date and time settings are
still correct after replacing the batteries and before shooting or recording of any type (follow
steps 1 and 2).
To correct the date and time settings.
œ After steps 1 and 2, press [l] to select the line of the setting that you want to change and press
[c] to select that setting. Then use the jog dial to set the new setting.
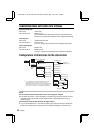
CLOCK SET
DISP OFF
2002/08/28
00:00
SELECT
SETTING
CLOCK SET
DISP OFF
2002/08/28
19:30
SELECT
SETTING
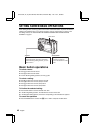
AUDIO REC
CLOCK SET
BEEP
DISCHARGE
LANGUAGE
TV SYSTEM
REFORMAT
SX511/EX, /E, /U (VPC-AZ1EX, VPC-AZ1E, VPC-AZ1 GB) Thu. Nov., 29/2001
47
English