


Chapter 3 Shooting 79
Chapter 3 Shooting
To continuously record the next scene
Repeat steps 4 and 5.
The scene number will be automatically incremented
from the previous number.
You can set or clear an “NG” designation for the
previously recorded scene before shooting the next
scene.
If you have stopped the recording, see “Resuming
Recording in ClipLink Mode” (page 81).
Notes
• During recording pause, pressing the STOP/PLAY/F
FWD/REW buttons, performing edit search, or
ejecting the cassette will interrupt the ClipLink
shooting. With this state, it is impossible to start back
space editing using ClipLink function. (The ClipLink
continue mode is canceled and indication
CONT
in the
display window disappears.) To perform back space
editing at the recording stop position, press the
ClipLink CONTINUE button before resuming
recording. If you do resume recording without
pressing this button first, the previous recorded data
(and Index Pictures) will be overwritten or otherwise
invalidated.
• Each time you press the STOP button, the number of
remaining clips is decremented by one. If you
resume recording with the same VCR, the number of
remaining clips is automatically incremented by one.
For details, see “Resuming Recording in ClipLink Mode”
(page 81).
• Do not unplug the power supply connector
(connected to a battery pack or AC outlet) while the
POWER switch is still set to ON, as this may cause
the ClipLink function to operate abnormally. Be sure
to set the POWER switch to OFF before
disconnecting the power supply.
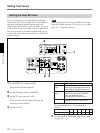
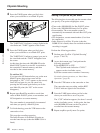
Setting Editing Points While
Shooting
You can use the TAKE button to record a time code
for a Cue point or a Mark IN/OUT point.
Setting Mark IN/OUT points as you shoot
The following data is recorded onto the cassette when
you specify Mark IN/OUT points while shooting
continuously at length, instead of during linked
recording of each scene.
• Time codes (HH:MM:SS) for Mark IN/OUT points
• Scene number: The scene number counter is
automatically incremented with each Mark OUT
point specification.
• NG specification, cassette name/number
• Index Pictures for all Mark IN points (when the
DSBK-301A is fitted): these are recorded each time
recording is stopped.
Note
The time codes for Rec IN/OUT points are not
recorded.
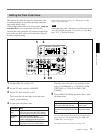
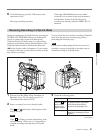
Perform the following procedure.
1 Perform steps 1 to 3 from “ClipLink Shooting”
(pages 77 and 78).
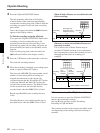
2 Access basic menu page 7 and perform the
following operations.
1) Set MARK/CUE to MARK.
The ClipLink mode indication “CLIP M”
appears on the viewfinder screen.
2) Set the cassette name or number if necessary.
For details of menu operations, see “Basic Menu
Operations” (page 92).
3 Press the VTR button on the camcorder or lens.
The camcorder starts recording, and the REC/
TALLY indicator(s) light(s) in the viewfinder.