


3-7
DVW-790WS/709WS/707
DVW-790WSP/709WSP/707P P2V1
3-1. Replacing Boards
Reinstallation
Required tools
. 40-pin positioning tool PG-163 : J-7031-630-A
. 40-pin CN positioning tool PG-215
: J-7032-150-A
Procedure
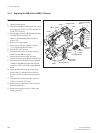
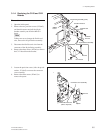
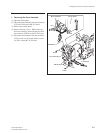
1. Temporarily assemble the 40-pin mounting
bracket (B), the water drop-proof packing,
and the CI-20 board.
n
Assemble them without using screws at this
state.
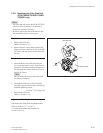
2. Insert one end of the 40-pin mounting bracket
(B) and shell of the 40-pin connector of the
CI-20 board into the PG-215 (40-pin CN
positioning tool).
n
Be sure to insert them positioning as shown
in the figure.
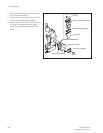
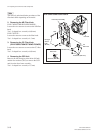
3. Pull the red lever of the PG-215 toward you
to retain the 40-pin mounting bracket (B) and
the shell of the 40-pin connector.
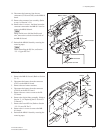
4. Secure the CI-20 board to the 40-pin mount-
ing bracket (B) using the two screws.
Standard tightening torque :
19 x 10
_2
N.m {1.9 kgf.cm}
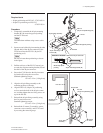
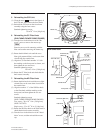
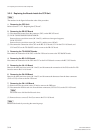
5. Align the 40-pin fitting assembly to the
mounting position of the unit.
6. Align the PG-163 (40-pin CN positioning
tool) to retain the shell of the 40-pin connec-
tor, and then tighten the two fixing screws on
top of the PG-163.
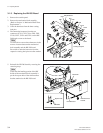
7. Reinstall the 40-pin fitting assembly using
the five precision screws.
Standard tightening torque :
53 x 10
_2
N.m {5.4 kgf.cm}
8. Reinstall the V mount (2) assembly, spacer,
connector cover assembly, and CI-21 board
by reversing the removing steps.
Red lever
40-pin fitting assembly
40-pin mounting
bracket (B)
40-pin mounting bracket (B)
Shell of the 40-pin connector
CI-20 board
CI-20 board
Water drop-proof packing
Water drop-proof
packing
P 2x4.5
PG-215
(40-pin CN positioning tool)
Direction of insertion
PG-163
Shell of 40-pin
connector
Fixed screw
PG-163
(40-pin CN positioning tool)
Precision
P 2.6x5
40-pin fitting
assembly