


Scene Selection (Clip List Editing)
115
Chapter 5 Operations in GUI Screens
To reedit clip lists on the disc
Use the Load Clip List command to load the clip
lists you want to edit, and perform the steps 2 to
4 in the previous section.
You can also delete clip lists on the disc.
For details, see “Managing clip lists” (page 119).
Note
Clip lists can be created and edited even when the Write
Inhibit tab of the disc is set to recording disabled.
However, if you need to save the clip list, set Write
Inhibit tab to enable recording before you create or edit
the clip list.
To add sub clips
You can add sub clips to clip lists from with the
clip thumbnail screen or the clip list thumbnail
screen. However, you must use the clip list
thumbnail screen to edit clip lists.
Adding sub clips from the clip thumbnail screen
The following procedure explains operations in
the clip thumbnail screen. You can proceed in the
same way in the expand thumbnail screen and the
chapter thumbnail screen. Expanded blocks are
added as sub clips in the expand thumbnail
screen, and chapters are added as sub clips in the
chapter thumbnail screen.
See page 103 for more information about thumbnail
screen operations.
1 In the clip thumbnail screen, select the
clip that you want to add as a sub clip
(multiple selections possible).
2 Display the Thumbnail Menu.
3 Select Add Sub Clips, and then press the
SET/S.SEL button or the MENU knob.
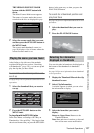
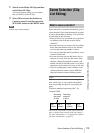
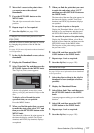
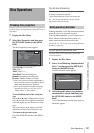
The Add Sub Clip screen appears.
The clip(s) selected in step 1 appear in the
upper part of this screen, and the clip list
appears in the lower Scene Selection
window. The I cursor in the Scene Selection
window indicates the location where the
currently selected sub clip(s) will be inserted.
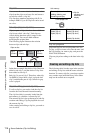
To display the total duration after
addition of the selected clip
Press the SHIFT button.
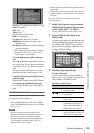
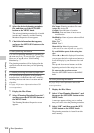
4 In the Scene Selection window, move
the I cursor to the location where you
want to insert the clip. (The existing
thumbnails arrange themselves to the
left and right of the I cursor.)
5 Press the SET/S.SEL button or the
MENU knob.
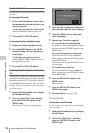
The selected clip is inserted as a subclip and
a “+” mark appears on the thumbnail in the
Scene Selection window.
To check the addition results
Move the cursor.
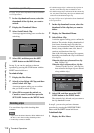
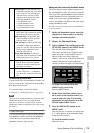
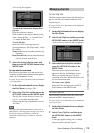
1 Add sub clips: Use the Add Sub Clips
command to add the clips you want to
use to a clip list. You can add up to
300 sub clips to one clip list.This
operation can be carried out in the
following thumbnail screens.
• Clip thumbnail screen
• Expand thumbnail screen
• Chapter thumbnail screen
• Clip list thumbnail screen
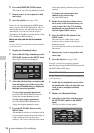
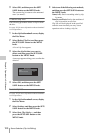
2 Change the sub clip order: Use the
Move Sub Clips command to change
the order of sub clips in a clip list.
Delete sub clips: Use the Delete Sub
Clips command to delete specified
sub clips from a clip list.
Trim sub clips: Use the Trim Sub Clip
command to adjust the In and Out
points of a sub clip. This function can
also be used to adjust the overall
duration of the clip list.
Set the start timecode: Use the Set
Start Time Code command to set the
timecode at the start of a clip list.
3 Play the clip list: Use the PLAY/
PAUSE button and other playback
controls to play the current clip list
and check its contents.
4 Save the clip list: Use the Save Clip List
or Save Clip List as… command to
save the newly created clip list to the
disc.
TOTAL
00:13:48:24
Add Sub Clip 017/035002
Scene Selection
TC 00:30:25:11
TC 00:24:24:29
TC 00:30:40:13
TC 00:24:34:27
TC 01:01:28:25
TC 00:24:46:22
TC 00:09:43:14
TC 00:24:56:24