


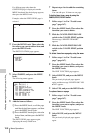

Setting the Status Display on the Viewfinder Screen and the LCD Monitor
176
Chapter 6 Menu Displays and Detailed Settings
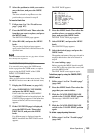
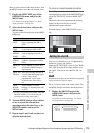
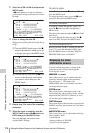
2 Select one of ID-1 to ID-4, and press the
MENU knob.
A x mark appears over the first character
position in the string, and characters can now
be input.
3 Enter or change the shot ID.
When you are entering the whole shot ID, go
to 2.
1 Turn the MENU knob to move the x
mark to the character which you want
to change, then press the MENU knob.
2 Turn the MENU knob until the
x mark
moves to the character position that
you want to select, then press the
MENU knob.
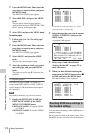
4 Repeat step 3 for each of the remaining
characters.
5 When the input is complete, turn the
MENU knob to move the
x mark over
END, then press the MENU knob.
This ends the input, and returns to the
original SHOT ID page.
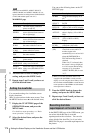
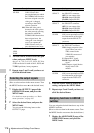
To insert a space
In step 3 above, move the x mark over INS, and
press the MENU knob.
To cancel inserting a space, move the x mark
over RET, then press the MENU knob.
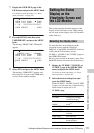
To delete a character
In step 3 of “Setting the shot ID” (page 175),
move the x mark over DEL, and press the
MENU knob.
This deletes the character under the x mark in the
shot ID row.
To cancel deleting the character, move the x
mark over RET, and press the MENU knob.
To cancel changing shot ID
Before executing step 5 of “Setting the shot ID”
(page 175), move the b mark over ESC, then
press the MENU knob or flick the CANCEL/
PRST/ESCAPE switch to ESCAPE.
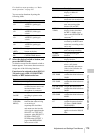
You can confirm the settings or status of the
camcorder on the LCDs by displaying the
following four screen.
ABNORMAL <!> screen
This window allows you to confirm why the !
(warning) indicator lights in the viewfinder.
You can use the ‘!’ LED page of the
OPERATION menu to set whether or not the !
(warning) indicator lights.
SYSTEM screen
This screen displays information such as the
system frequency, the recording format, whether
output from the TEST OUT connector is on or
off, and the type of output signal.
FUNCTION screen
This screen displays the functions assigned to the
ASSIGN switches, the detection level, and other
information.
AUDIO STATUS screen
This screen allows you to confirm the following
items related to audio.
• Audio bit rate
• Setting condition of DF/NDF
• Type of front microphone
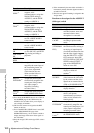
ID-1 :?
x
ID-2 :
ssssssssssss
ID-3 :
ssssssssssss
ID-4 :
ssssssssssss
!#$%&'()*+,-./012345678
9:;<=>?@ABCDEFGHIJKLMNOP
QRSTUVWXYZ[ ]abcdefghijk
lmnopqrstuvwxyz~
INS DEL RET ESC END
TOP 017 SHOT ID
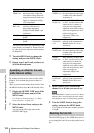
ID-1 :?
x
ID-2 :
ssssssssssss
ID-3 :
ssssssssssss
ID-4 :
ssssssssssss
!#$%&'()*+,-./012345678
9:;<=>?@ABCDEFGHIJKLMNOP
QRSTUVWXYZ[ ]abcdefghijk
lmnopqrstuvwxyz~
INS DEL RET ESC END
TOP 017 SHOT ID
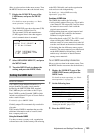
ID-1 :?+
ID-2 :
ssssssssssss
ID-3 :
ssssssssssss
ID-4 :
ssssssssssss
!#$%&'()*+,-./012345678
9:;<=>?@ABCDEFGHIJKLMNOP
QRSTUVWXYZ[ ]abcdefghijk
lmnopqrstuvwxyz~
INS DEL RET ESC END
TOP 017 SHOT ID
Displaying the status
confirmation screens