


Setting the Time Data
69
Chapter 3 Adjustments and Settings for Shooting
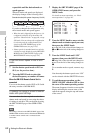
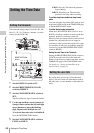
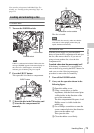
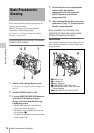
1 Set the DISPLAY switch to U-BIT.
2 Set the F-RUN/SET/R-RUN switch to
SET.
The first (leftmost) digit flashes.
3 Use the up and down arrow buttons to
change values, and use the left and right
arrow buttons to move the flashing
digit. Repeat until all digits are set.
To reset the user bit data to 00 00 00 00
Press the RESET/RETURN button.
4 Set the F-RUN/SET/R-RUN switch to
F-RUN or R-RUN, corresponding to the
desired operating mode for the
timecode generator.
The set user bit data will be recorded for both
LTC and VITC.
To store the user bit setting in memory
The user bit setting (apart from the real time) is
automatically retained in memory even when the
power is turned off.
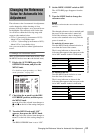
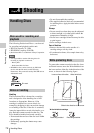
You can synchronize the internal timecode
generator of this camcorder with an external
generator for the regeneration of an external
timecode. You can also synchronize the timecode
generators of other camcorders/VTRs with the
internal generator of this camcorder.
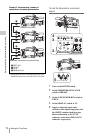
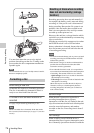
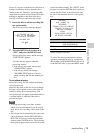
Connections for timecode
synchronization
Connect both the reference video signal and the
external timecode as illustrated below.
Example 1: Synchronizing with an external
timecode
a) Set GENLOCK to ON on the GENLOCK page of the
MAINTENANCE menu, if GENLOCK is set to OFF.
Synchronizing the timecode
AUTO
FRONT
WIRELES
S
THUMBNAIL
SET
S.SEL
SHIFT
ESSENCE
MARK
CLIP MENU
SUB CLIP
REAR
CH-1
MANUAL
AUDIO SEL
E
AUDIO I
N
LEV
E
010
PRESET
F-RUN
REGEN
SET
CLOCK
R-RUN
BRIGHTDISPLAYRESETHOLDDISP SEL
COUNTER RC U-BITEXPAND CHAPTER
1
3
2,4
RESET/RETURN button
1GENLOCK IN
a)
2TC IN
2
1
Reference video signal
External timecode