


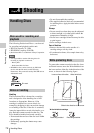

Basic Procedure for Shooting
78
Chapter 4 Shooting
Notes
• It is not possible to record a clip shorter than 2 seconds.
If you stop recording within 2 seconds of starting, this
results in a 2-second clip.
If you stop recording and restart within 2 seconds of
the original start, this creates a single continuous clip
from the original start time.
• The maximum number of clips that can be recorded on
a single disc is 300. If an attempt is made to record
more than 300 clips, the error message “MAX # Clips”
appears, even if there is free capacity on the disc.
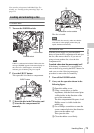
Playback control buttons
During recording, the playback control buttons
(EJECT, F REV, F FWD, NEXT, PREV, PLAY/
PAUSE, STOP) have no effect.
Normal playback
By pressing the PLAY/PAUSE button, you can
review any length of recording on the viewfinder
screen in black and white or in color on the LCD
monitor. There are two other ways to review the
recording.
Recording review: You can view the last two
seconds of the recording on the viewfinder
screen in black and white or in color on the
LCD monitor.
Viewing color playback on a video monitor:
You can view the recording in color on a
color video monitor without the need for any
external adaptor.
You can also view palyback video during a fast
forward or reverse search.
For details about the switches and controls used to
select the audio output signal and to adjust the audio
level, see page 18 and page 26.
To freeze a picture during playback
The following operation can also be done from
the RM-B150/B750 Remote Control Unit.
1 Press the PLAY/PAUSE button to start
playback.
2 Press the PLAY/PAUSE button again at
the instant when you want to freeze the
picture.
The playback pauses and a frozen picture
appears.
The timecode of the frozen frame is
displayed in the counter display and the
PLAY/PAUSE indicator now flashes (one
flash/second).
To restart playback
Press the PLAY/PAUSE button once again.
To display camera video in the
viewfinder during playback (Live & Play
function)
During playback, the viewfinder normally
displays the playback video. But you can enable
this function to view live camera video instead.
This is a convenient way to frame the next shot
and adjust the focus and exposure while viewing
recorded video on the LCD monitor or an external
monitor.
(How to select an item in the menu screen: Turn
the MENU knob to move the b mark to the
desired item.)
1 Display the OUTPUT 2 page of the
OPERATION menu.
For details on menu operations, see “Basic
menu operations” on page 163.
2 Select LIVE & PLAY, and then turn the
MENU knob to display “ON”.
The camera video appears in the viewfinder,
even during playback.
You can still check the playback video on the
LCD monitor. Playback signals are output
from the video output connectors.
Disc playback start position
Although this unit uses optical discs, it is
designed to offer the most convenient features of
tape playback by VTRs. One of these is the
playback start position, which works in the same
way as with tape, as described below.
After playback stop
The unit stops at the position where the STOP
button was pressed.
Press the PLAY/PAUSE button to resume
playback at the stop position.
After recording
The unit stops at the position where recording
ended.
Playing back the recorded clip