


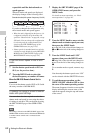


Adjusting the Audio Level
66
Chapter 3 Adjustments and Settings for Shooting
REAR2/WRR LEVEL: Audio recording level
of channel 2
Note
When you have operation of the LEVEL (CH-1/CH-2)
controls and MIC LEVEL control linked together, if the
MIC LEVEL control is set to 0, the audio signals on
channels 1 and 2 cannot be recorded. Check the position
of the MIC LEVEL control before adjusting the LEVEL
(CH-1/CH-2) controls.
Note
If the XLR connection automatic detection mode is on,
when the cables are connected to the AUDIO IN CH1/
CH2 connectors, the camcorder detects the connection to
the AUDIO IN CH1/CH2 connectors. Thus, the AUDIO
IN switches are internally reset to REAR and the audio
signals input to the AUDIO IN CH1/CH2 connectors are
automatically selected.
Before adjusting the audio level of the front microphone,
confirm that no cables are connected to the AUDIO IN
CH1/CH2 connectors. Alternatively, set the REAR XLR
AUTO item to “OFF” on the AUDIO-1 page of the
MAINTENANCE menu.
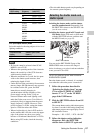
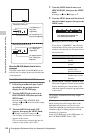
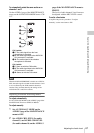
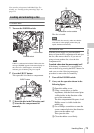
1 Set either or both of the AUDIO IN
switch(es) to FRONT.
2 Set the AUDIO SELECT switch(es) for
the desired channel(s) selected in step 1
to MANUAL.
3 Turn the MIC LEVEL control, and
adjust so that the audio level meter
shows up to –20 dB for a normal input
volume.
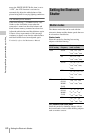
Correspondence between recording level
adjustments and audio level controls
On the AUDIO-3 page of the MAINTENANCE
menu, you can select which audio level control
controls the audio recording level of the front
microphone input. The correspondences between
the settings of the menu items and the controls are
as follows.
MIC CH1 LEVEL: Audio recording level of
channel 1
MIC CH2 LEVEL: Audio recording level of
channel 2
Note
When you have operation of the MIC LEVEL control
and LEVEL (CH-1/CH-2) controls linked together, if the
LEVEL (CH-1/CH-2) controls are set to 0, the audio
signals on channels 1 and 2 cannot be recorded. Check
the position of the LEVEL (CH-1/CH-2) controls before
adjusting the MIC LEVEL control.
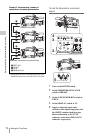
Selecting the recorded audio
You can select the audio recorded on audio
channels 3 and 4 with the AUDIO IN CH-3/CH-
4 switches, or you can have the selection made
automatically, as follows.
Setting Control
SIDE2 LEVEL (CH-2) control (on the right)
FRONT MIC LEVEL control
F+S2 LEVEL (CH-2) control linked with
MIC LEVEL control.
Manually adjusting the audio
level of the MIC IN connector
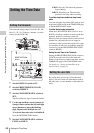
AUTO
FRONT
WIRELESS
REAR
CH-1
MANUAL
AUDIO SELECT
AUDIO IN
F
W
R
F
W
R
LEVEL
010010
CH-2
CH-3
CH-4
PRESET
F-RUN
REGEN
SET
CLOCK
R-RUN
2
3
1
Setting Control
SIDE1 LEVEL (CH-1) control (on the left)
FRONT MIC LEVEL control
F+S1 LEVEL (CH-1) control linked with
MIC LEVEL control.
Setting Control
SIDE2 LEVEL (CH-2) control (on the
right)
FRONT MIC LEVEL control
F+S2 LEVEL (CH-2) control linked with
MIC LEVEL control.
Recording audio on channels 3
and 4