


Testing the Camcorder Before Shooting
209
Chapter 9 Maintenance
Check the functions of the camcorder before
setting out for a shooting session, preferably by
operating the camcorder together with a color
video monitor.
1 Attach a fully charged battery pack.
2 Set the POWER switch to ON and
check that the HUMID indicator does
not appear and that the BATT indicator
shows at least five segments.
• If the HUMID indicator appears, wait until
it disappears.
• If the BATT indicator does not show at
least five segments, replace the battery
pack with a fully charged one.
3 Check that there are no obstructions
near the disc compartment, and then
press the EJECT button to open the disc
compartment lid.
4 After confirming that the disc is not
write-protected, load the disc and close
the disc compartment lid.
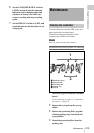
Set the switches and selectors as follows.
Testing the viewfinder
1 Adjust the position of the viewfinder.
2 Check that the color bars are displayed
on the viewfinder screen, and adjust the
BRIGHT, CONTRAST, and
PEAKING controls to give the best
color bar display.
Chapter9 Maintenance
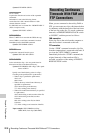
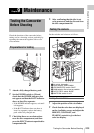
Testing the Camcorder
Before Shooting
Preparations for testing
3
41
2
Testing the camera
4356
1
2
1Iris switch: Automatic
2Zoom selector: SERVO/MAN
3VDR SAVE/STBY switch: SAVE
4GAIN selector: Set as low as possible.
5OUTPUT/DCC switch: BARS
6WHITE BAL switch: A or B