


Advanced Operations for Shooting
80
Chapter 4 Shooting
Shot marks and other essence marks can be
recorded on the disc.
Recording essence marks for scenes containing
important images and sounds enables quick
access to the marked points. This increases
editing efficiency.
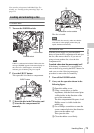
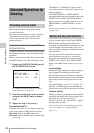
To record a shot mark using the RET
button on the lens
To make it possible to record shot marks using the
RET button on the lens, carry out the following
procedure.
(How to select an item in the menu screen: Turn
the MENU knob to move b to the desired item.)
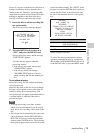
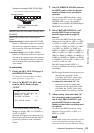
1 Display the ESSENCE MARK page of
the MAINTENANCE menu.
For details on menu operations, see “Basic
menu operations” on page 163.
2 Select the essence mark to be recorded,
and press the MENU knob to display
“ON”.
3 Repeat the step 2, as necessary.
To record shot mark 1/2
When the camcorder is in recording or playback
mode, operate the lens RET button as follows.
Shot mark 1: Press the RET button once.
Shot mark 2: Press the RET button twice in rapid
succession.
“ShotMark1” or “ShotMark2” appears in the
viewfinder screen for about one second near the
timecode display.
If the SHOT MARK 1 or SHOT MARK 2
recording function has been assigned to one of the
ASSIGN 1/3/4 switches and COLOR TEMP.
button, you can also use that switch to record a
SHOT MARK 1 or SHOT MARK 2 essence
mark.
On how to assign functions to the ASSIGN switches,
see page 178.
You can set three types of clip flags (OK/NG/
KEEP) during recording, immediately after
recording, or during playback. Setting these flags
in each clip that you record makes it easy for
editors and other colleagues to find and select the
clips they need.
You can use switches on the unit to set these
flags. But before you can do so, you need to
assign the corresponding flag functions to the
ASSIGN 1/3/4 switches, the COLOR TEMP
button, or the RET button on the lens (see page
178).
To set a clip flag
During recording, immediately after recording, or
during playback (including search and still
picture playback), press the button to which the
flag function has been assigned. Press the button
once at the position where you want to set the
flag.
The specified flag is set, and “*** ClpFlg” (***:
OK, NG, or KEEP) appears near the timecode
display in the viewfinder for about three seconds.
To clear a clip flag
During recording or playback, press the button to
which the flag function has been assigned. Press
the button twice in rapid succession.
The flag is cleared, and “ClpFlg DEL.” appears
for about three seconds.
You can also set and clear clip flags from a GUI
screen. For details, see “Setting clip flags”
(page 111).
Advanced Operations for
Shooting
Recording essence marks
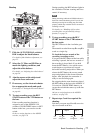
?M11 ESSENCE MARK TOP
RET SHOT MARK 1 : ON
RET SHOT MARK 2 : ON
INDEX PIC. POS : 0SEC
Setting clip flags with switches