


Scene Selection (Clip List Editing)
117
Chapter 5 Operations in GUI Screens
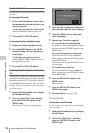
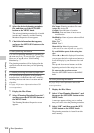
4 Move the I cursor to the point where
you want to move the selected
thumbnails.
5 Press the SET/S.SEL button or the
MENU knob.
The sub clips are moved to the I cursor
position.
6 Repeat steps 1 to 5 as required.
7 Save the clip list (see page 118).
To adjust the In and Out points of sub
clips (trim)
Proceed as follows to define the range of a scene
by changing the positions of the In and Out
points.
See page 103 for more information about thumbnail
screen operations.
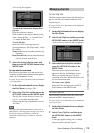
1 In the clip list thumbnail screen, select a
thumbnail.
2 Display the Thumbnail Menu.
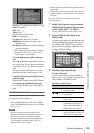
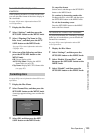
3 Select Trim Sub Clip, and then press the
SET/S.SEL button or the MENU knob.
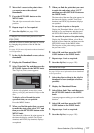
The Clip List (Trim) screen appears.
Like the clip playback screen, this screen
allows you to play and search all clips on the
disc.
To display a list of In and Out point
operations that you can perform
Press the MENU button.
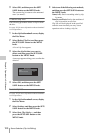
4 When you find the point that you want
to make the start point, select “IN” and
then press the SET/S.SEL button or the
MENU knob.
The timecode of the new In point appears in
the timecode display, and the Total (total
duration) and DUR (clip duration) displays
are updated.
5 When you find the point that you want
to make the end point, select “OUT”
and then press the SET/S.SEL button or
the MENU knob.
The timecode of the new Out point appears in
the timecode display, and the Total (total
duration) and DUR (clip duration) displays
are updated.
To cue up the In point or Out point
Display the Thumbnail Menu, select Cue up
Inpoint or Cue up Outpoint, and then press
the SET/S.SEL button or the MENU knob.
To cancel the In point or Out point setting
Display the Thumbnail Menu, select Reset
Inpoint or Reset Outpoint, and then press the
SET/S.SEL button or the MENU knob.
The In point or Out point setting returns to
the previous value.
6 Select OK, and then press the SET/
S.SEL button or the MENU knob.
7 Repeat steps 1 to 6 as required.
8 Save the clip list (see page 118).
To delete sub clips
See page 103 for more information about thumbnail
screen operations.
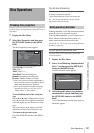
1 Select the clips to delete in the clip list
thumbnail screen (multiple selections
possible).
2 Display the Thumbnail Menu.
3 Select Delete Sub Clips, and then press
the SET/S.SEL button or the MENU
knob.
A message appears asking you to confirm the
deletion.
4 Select OK, and then press the SET/
S.SEL button or the MENU knob.
5 Repeat steps 1 to 4 as required.
6 Save the clip list (see page 118).
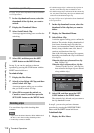
Clip List (Trim)
001/034
TCR
CLIP
01:17:33:08 019/035
01:17:33:08
Total
IN
00:13:48:24
DUR
00:00:21:27
OK
Cancel
01:17:55:05
OUT