


Advanced Operations for Shooting
86
Chapter 4 Shooting
the light turns on and off automatically. However,
the light remains on continuously if the off time is 5
seconds or less.
When the LIGHT switch is set to MANUAL and
the light switch is set to ON, the light remains on
continuously. (The light does not turn on and off
automatically.)
When the setting is completed, the following
message appears along the bottom of the
viewfinder screen.
In single shot mode: MANU INTERVAL *
FRAME
In consecutive mode: MANU INTERVAL *
SEC * FRAME
“* SEC” indicates the length of interval and “*
FRAME” indicates the number of frames.
The camcorder exits Manual Interval Rec mode
whenever it is powered off. However, the
NUMBER OF FRAME, TRIGGER INTERVAL,
and PRE-LIGHTING settings are maintained.
You do not need to set them again the next time
you use Manual Interval Rec mode.
To shoot and record
1 After performing the basic procedures
for shooting and recording, following
the instructions in “Basic Procedure for
Shooting” (page 76), secure the
camcorder so that it will not move.
2 Press the REC START button or the
VTR button on the lens.
The camcorder starts recording in Manual
Interval Rec mode. When you use the PRE-
LIGHTING function, recording starts after
the light is switched on.
While recording in Manual Interval Rec
mode, the TALLY (green tally) indicator in
the viewfinder flashes (2 or 4 flashes/second)
and the message “MANU INTERVAL (*
SEC) * FRAME” flashes on the viewfinder
screen.
To exit Manual Interval Rec mode
Do one of the following.
• In the single shot mode, press the EJECT
button.
• In the consecutive mode, press the REC START
button or the lens VTR button to stop recording.
• Set the POWER switch to OFF.
After the camcorder has exited from Manual
Interval Rec mode, it records picture data stored
in memory to the disc.
Even if you run out of free disc capacity while
recording, you can continue recording by using
the Disc Exchange Cache function. This function
enables seamless recording over extended
recording sessions, too long to fit on one disc, by
recording to the unit’s internal memory while you
exchange the disc.
Note
The unit’s internal memory is not unlimited, so the video
and audio may be interrupted if it takes too long to
exchange the disc.
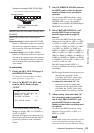
To enable the Disc Exchange Cache
function
1 Display the REC FUNCTION page of
the OPERATION menu.
For details on menu operations, see “Basic
menu operations” on page 163.
2 Select DISC EXCHG CACHE, and
turn the MENU knob to display “ON”.
The TALLY (green tally) indicator lights in
the viewfinder.
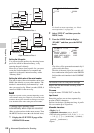
To exchange discs with the function
enabled
When the disc exchange cache function is
enabled, the following procedure allows you to
exchange discs while continuing to record.
1 Press the REC START button or the
VTR button on the lens to start
recording.
The REC (recording, red tally) indicator
lights in the viewfinder, and the tally
indicator lights.
2 Press the EJECT button with the unit
still in the recording state.
To exchange discs while record-
ing (Disc Exchange Cache func-
tion)