


You can do this in the following ways:
●
In the Windows driver dialog: select the Features tab, then Rotate by 90 degrees.
●
In the MAC OS X Print dialog: go to the Finishing panel and select Rotate by 90 degrees.
●
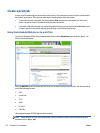
On the Embedded Web Server's Submit Job page: select Advanced settings > Roll options > Rotate.
●
In the front panel: select the Setup menu icon
, then Printing preferences > Paper options >
Rotate.
NOTE: If rotation is set from your computer, it overrides the setting in the front panel.
NOTE: When you rotate a job, the page length may be increased to avoid clipping, because the top and
bottom margins are usually larger than the side margins.
NOTE: If you rotate an image to landscape whose original orientation was portrait, the paper may not be
wide enough for the image. For example, rotating a portrait D/A1-size image on D/A1-size paper by 90
degrees will probably exceed the width of the paper. If you are using the Embedded Web Server, the preview
screen will confirm this with a warning triangle.
Autorotate
The Autorotate option automatically rotates jobs by 90 degrees if doing so will save paper.
Autorotation allows you to defer the decision of rotating a page until printing time. This may be useful if you
routinely work with different roll sizes and want to ensure that plots will not get clipped or waste
unnecessary paper width if and when roll conditions change.
To enable autorotation:
●
In the Windows driver dialog: select the Features tab, then Autorotate.
●
In the MAC OS X Print dialog: go to the Finishing panel and select Autorotate.
●
On the Embedded Web Server's Submit Job page: select Advanced settings > Roll options >
Autorotate.
●
In the front panel: select the Setup menu icon
, then Job management > Autorotate.
NOTE: If autorotation is set from your computer, it overrides the setting in the front panel.
90 Chapter 6 Print options ENWW