


Chapter 10 Maintenance
164
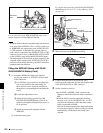
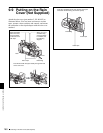
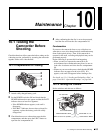
10-1 Testing the Camcorder Before Shooting
Testing the viewfinder
Proceed as follows.
1
Adjust the position of the viewfinder.
2
Check that the color bars are displayed on the
viewfinder screen, and adjust the BRIGHT,
CONTRAST, and PEAKING controls to give the best
color bar display.
3
Check each of the following operations.
• The menu is displayed on the viewfinder screen.
• Turn the MENU knob and check that the menu page
changes to the next page.
• Press the MENU knob and check that settings of
each item of the selected page are displayed.
• Turn the MENU knob and check that the b mark
moves within the page.
• Press the MENU knob and check that the b mark
placed before the item changes to a z mark and the
z mark placed before the setting of the item changes
to a ? mark.
• Turn the MENU knob and check that the setting of
the selected item changes.
4
Set the OUTPUT/DCC switch to CAM, and change
the FILTER selector position in the sequence of 1, 2, 3
and 4.
Check that the FILTER indicator on the viewfinder
screen displays the correct numbers.
5
Carry out of the following operations, and check that
that the ! indicator lights if the corresponding item has
been turned on on the '!' LED page of the USER menu.
• Set the gain to anything but 0 dB by using the GAIN
selector and the GAIN SW page of the
OPERATION menu.
• Set the SHUTTER selector to ON.
• Set the WHITE BAL switch to PRST.
• Use the lens extender.
• Set the FILTER selector to other than the position
“1” (PDW-510/510P) or other than the position
“1B” (PDW-530/530P).
• Set the reference value of the auto iris to other than
the standard value.
6
Move the SHUTTER selector from ON to SELECT
repeatedly, and check that the shutter setting changes
on the viewfinder screen.
7
Pointing the camera at a suitable subject, focus the
camera and check the picture on the viewfinder screen.
8
Set both of the AUDIO IN switches to FRONT, and
check that when sound is input to a microphone
connected to the MIC IN connector on the front of the
camcorder, the audio level indicators appear on the
viewfinder screen.
9
Check that setting the ZEBRA switch to ON and OFF
makes the zebra pattern appear and disappear on the
viewfinder screen.
Note
The results of checking in steps 3 to 9 may not be as
expected, depending on the settings relating to the
viewfinder display function. In this case, set the desired
items on the VF DISP 1 and VF DISP 2 pages of the USER
menu.
For details, see 7-2-2 “Selecting the Display Items” on
page 114.
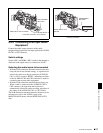
Testing the iris and zoom functions
1
Set the zoom to automatic zoom mode and check that
the power zoom operates correctly.
2
Set the zoom to manual zoom mode and check the
zoom functions manually.
3
Set the iris switch on the lens to AUTO and point the
camera at objects of different brightness. Check that
the automatic iris adjustment operates correctly.
4
Set the iris switch on the lens to MANUAL and check
that turning the iris ring manually adjusts the iris
correctly.
5
Set the iris switch on the lens back to AUTO and check
the following points when the GAIN selector is moved
from L to M to H.
• For objects of the same brightness, the iris is
adjusted to correspond to the change in setting.
• The gain indicator on the viewfinder screen changes
to correspond to the change in setting.
6
If an extender mechanism is incorporated in your lens,
put the extender lever of the lens into the 2x position
and check the following points.
• The indication “EX” appears at the top left on the
viewfinder screen.
• The auto iris functions correctly.
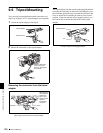
10-1-3 Testing the VDR
Perform tests (1) to (7) consecutively.