


Chapter 3 Recording and Playback
47
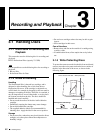
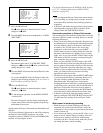
3-2 Recording
Basic procedure for shooting: from adjusting the black balance and
white balance to stopping recording
1
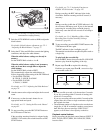
Push the AUTO W/B BAL switch to BLK to adjust the
black balance.
For details of black balance adjustment, see 5-2-1
“Adjusting the Black Balance” on page 77.
2
Select the CC filter and ND filter to match the lighting
conditions, and adjust the white balance.
When the white balance settings are already in
memory
Set the WHITE BAL switch to A or B.
When the white balance setting is not in memory
and you do not have enough time to adjust the
white balance
Set the WHITE BAL switch to PRST.
This automatically adjusts the white balance as
follows, depending on the setting of the FILTER knob.
• For the PDW-530/530P:
B: 3200 K, C: 4300 K, D: 6300 K
• For the PDW-510/510P:
1: 3200 K, 3: 5600 K
For details, see 5-2-2 “Adjusting the White Balance”
on page 78.
3
Aim the camera at the subject and adjust the focus and
zoom.
4
If necessary, set the electronic shutter for an
appropriate mode and speed.
For details, see 5-3 “Setting the Electronic Shutter”
on page 81.
5
To start recording, press the REC START button or
the VTR button on the lens.
If the recording start/stop function is assigned to the
ASSIGN 1/3/4 switch, this switch functions as REC
START button.
For details, see 7-3-5 “Assigning Functions to
ASSIGN 1/2/3/4 Switches” on page 125.
During recording, the REC indicator lights in the
viewfinder. Perform zooming and focus control, if
necessary.
Note
During recording (while the ACCESS indicator is lit)
do not remove the battery pack. If you do, the internal
processing for recording may not finish properly,
which may cause the last few seconds of recording to
be lost.
For details, see 3-1-6 “Handling of Discs When
Recording Does Not End Normally (Salvage
Function)” (page 44).
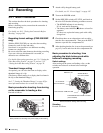
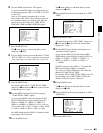
6
To stop recording, press the REC START button or the
VTR button on the lens again.
The REC indicator in the viewfinder goes off.
The material recorded from step 5 to step 6 is saved as
a single clip.
To play back the recorded clip
Press the PREV button, then press the PLAY/PAUSE
button to play from the beginning of the clip.
7
Repeat steps 5 and 6 as required for shooting.
Each time you repeat steps 5 and 6 , successive clips
are recorded on the disc.
Notes
• It is not possible to record a clip shorter than 2 seconds.
If you stop recording within 2 seconds of starting, this
results in a 2-second clip.
If you stop recording and restart within 2 seconds of the
original start, this creates a single continuous clip from
the original start time.
• The maximum number of clips that can be recorded on a
single disc is 300. If an attempt is made to record more
than 300 clips, the error message “DISC FULL!”
appears, even if there is free capacity on the disc.
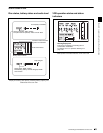
Playback control buttons
During recording, the playback control buttons (EJECT, F
REV, F FWD, NEXT, PREV, PLAY/PAUSE, STOP)
have no effect.
1,2
2
4
5,6
3,5
REC
START
REC
STOP
REC
START
REC
STOP
REC
START
REC
STOP
Clip 1 Clip 2 Clip 3