


Chapter 2 Locations and Functions of Parts and Controls
20
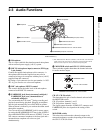
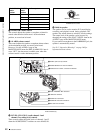
2-2 Accessory Attachments
2-2 Accessory Attachments
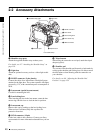
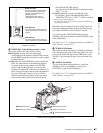
a Shoulder strap posts
Attach the supplied shoulder strap to these posts.
For details, see 9-7 “Attaching the Shoulder Strap” on
page 159.
b Light shoe
Attach an optional accessory such as a video light to this
shoe.
c LIGHT connector (2-pin, female)
Connect the cable of an Anton Bauer Ultralight System
attached to the light shoe. The system operates with lights
powered by 12 V, with a maximum power consumption of
50 W.
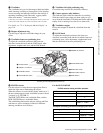
d Lens mount (special bayonet mount)
Use this for mounting the lens.
e Lens locking lever
After inserting the lens in the lens mount, rotate the lens
mount ring with this lever to lock the lens in position.
f Lens mount cap
Remove this cap by pushing up the lens locking lever.
When no lens is mounted, keep this cap fitted for
protection from dust.
g LENS connector (12-pin)
Fit the lens cable to this connector. Contact your Sony
representative for more information about the lens you can
use.
h Tripod mount
When using the camcorder on a tripod, attach the tripod
adaptor (option).
i Shoulder pad
You can move the shoulder pad forwards or backwards by
raising up the shoulder pad locking lever. Do this to ensure
the best balance when shooting with the camcorder on
your shoulder.
For details, see 9-8 “Adjusting the Shoulder Pad
Position” on page 159.
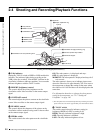
3 LIGHT connector
4 Lens mount
2 Light shoe
1 Shoulder strap posts
5 Lens locking lever
6 Lens mount cap
7 LENS connector
8 Tripod mount
9 Shoulder pad
Lens cable clamp