


Chapter 10 Maintenance
166
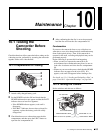
10-1 Testing the Camcorder Before Shooting
4
Aim the microphones at a sound source.
5
Check that the audio level meters on the color and
monochrome LCDs and the audio level indicators in
the viewfinder reflect the changing sound level.
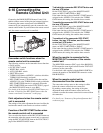
(6) Checking the XLR connection
automatic detection function
Before starting to check, remove the front microphone
connected to the MIC IN connector if it is connected.
1
Perform the operations of steps 1 and 2 explained in
(5) “Testing external microphones”.
2
Set the AUDIO IN CH-1/CH-2 switches to FRONT.
3
Perform the operations of steps 4 and 5 explained in
(5) “Testing external microphones”.
If the audio level meters on the color and monochrome
LCDs and the audio level indicators in the viewfinder
reflect the changing sound level, the function of the
XLR connection automatic detection is working
correctly.
If it does not reflect the changing sound level, the
function of the XLR connection automatic detection
function is off. Set REAR XLR AUTO to “ON” on the
VDR MODE 1 page of the MAINTENANCE menu.
If it does not reflect even after making this setting, the
XLR connection automatic detection function does not
work correctly.
(7) Checking the user bit and time code
functions
1
Set the user bits as required.
For the operation, see 5-6-3 “Setting the User Bits”
on page 89.
2
Set the time code.
For the operation, see 5-6-1 “Setting the Time Code”
on page 89.
3
Set the F-RUN/SET/R-RUN switch to R-RUN.
4
Press the REC START button, and check that
recording starts and that the time code indication in the
counter display changes.
5
Press the REC START button again, and check that
recording stops and that the time code indication stops
changing.
6
Set the F-RUN/SET/R-RUN switch to F-RUN, and
check that the time code indication starts changing
again and continues to change even when you restart
recording and stop recording again.
7
Set the DISPLAY switch to U-BIT, and check that the
user bit data that was set is displayed.