


Getting Started
1780R-Series Operator’s Manual
1–7
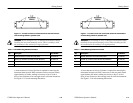
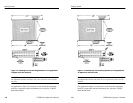
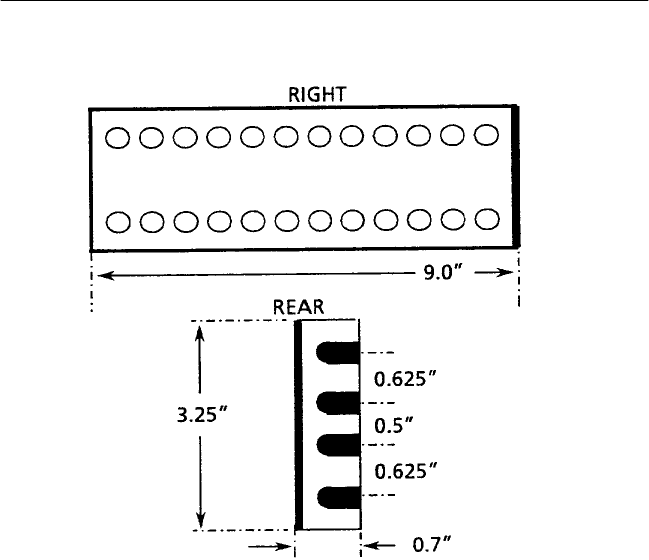
Figure 1–3: Dimensions of the adjustable rear rack-mounting bracket
To install the instrument in the rack: First remove the four securing
screws and take the instrument out of the rack-mounting cabinet.
(All 1780R-Series instruments are shipped in the rack-mounting
cabinet to provide extra shipping protection.) Once the instrument is
out of the cabinet, mount the front of the cabinet in the rack, using
four 10–32 TORXR screws. Cabinet front slots are spaced, and wide
enough, to accommodate standard racks. Next, mount the adjustable
brackets to the rear rack section. See Figure 1–3 for bracket
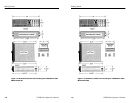
dimensions. Then mount the adjustable brackets to the rack-mount
cabinet using four 10–32 TORXR screws, four number 10 flat
washers, and the nut bars. See Figure 1–4 for more assembly detail.
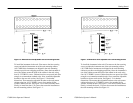
Finally, re-install the four 6–32 screws that secure the instrument to
the rack-mounting cabinet. See Figure 1–1.
Getting Started
1780R-Series Operator’s Manual
1–7
Figure 1–3: Dimensions of the adjustable rear rack-mounting bracket
To install the instrument in the rack: First remove the four securing
screws and take the instrument out of the rack-mounting cabinet.
(All 1780R-Series instruments are shipped in the rack-mounting
cabinet to provide extra shipping protection.) Once the instrument is
out of the cabinet, mount the front of the cabinet in the rack, using
four 10–32 TORXR screws. Cabinet front slots are spaced, and wide
enough, to accommodate standard racks. Next, mount the adjustable
brackets to the rear rack section. See Figure 1–3 for bracket
dimensions. Then mount the adjustable brackets to the rack-mount
cabinet using four 10–32 TORXR screws, four number 10 flat
washers, and the nut bars. See Figure 1–4 for more assembly detail.
Finally, re-install the four 6–32 screws that secure the instrument to
the rack-mounting cabinet. See Figure 1–1.