


56
Recording
Chapter 4 Recording and Playback
MAINTENANCE connector, you can record shot marks
from Shot Mark0 up to Shot Mark9 by pressing the 0 to 9
keys on the numeric keypad.
If the unit is set up to display superimposed text
information (see page 45), “SHOTMARK*” (*: 0 to 9)
appears every time you set an essence mark.
When Shot Mark0 to Shot Mark 9 is set, you can search for
the shot marks by displaying thumbnails of the frames at
those positions (see page 76).
You can also use shot mark positions as edit points during
scene selection operations (see page 85).
You can also set shot marks during playback. See page 64
for the procedure.
To set a clip flag
You can set one of the three types of flag (OK, NG or
KEEP) for the clip while it is being recorded by viewing its
video image and using the function menu (see page 51).
You can also set a clip flag during playback. See page 64
for details.
You can also set a clip flag on the GUI screen. See page 82
for details.
Continuing recording while
exchanging discs (disc exchange
cache function)
About 30 seconds (this duration may differ depending on
the state of a disc) of video and audio data can be recorded
to the unit’s internal memory cache during a disc
exchange, and then written back to the newly loaded disc.
1
Check that setup menu item 150 REC MODE is set to
“disc exchange cache”.
If the disc exchange cache indication is lit in the time
data display area (see page 24) of the basic operation
display, setup menu item 150 REC MODE is set to
“disc exchange cache”.
2
If none of the indications of step 1 appear, set setup
menu item 150 REC MODE to “disc exchange cache”
(see page 130).
The setting of 150 REC MODE can be changed even
during recording.
However, if you change the setting from “clip
continuous rec”, the setting change is enabled after the
end of Clip Continuous Rec mode recording.
3
Exchange the disc.
When recording on the current disc ends, the disc is
ejected. Until the next disc is inserted, the unit records
to its internal cache memory. Then, after the new disc
is inserted, it copies the data from the cache to the disc
and resumes normal recording.
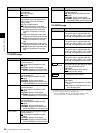
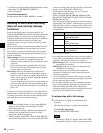
Disc exchange cache indications and their
meanings
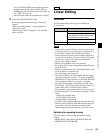
“C” indications in superimposed text information
and their meanings
To stop disc exchange cache recording
Do any of the following during cache recording.
• Press the STOP button.
• Set setup menu item 150 REC MODE to “normal”.
• If the disc becomes full while setup menu item 150 REC
MODE is set to “disc exchange cache”, the disc is
ejected and the unit continues to record to its internal
memory (for about 30 seconds depending on the state of
a disc).
• Recording and playback operations by all buttons and
dials other than the STOP button are disabled during
cache recording.
• If the amount of cache data exceeds the capacity of the
unit’s internal memory during a disc exchange, an alarm
message appears and the data in cache memory is
overwritten. The internal memory always contains the
latest cache data, so the clip data will be continuous after
the next disc is inserted and recording to the disc
resumes.
Indication Meaning
Right side of icon
flashes once per
second
Recording to the cache
Left side of icon
flashes twice per
second
Remaining memory capacity: Low
Whole icon flashes
four times per
second
Remaining memory capacity:
None (disc full)
Indication Meaning
“C” flashes once
per second
Recording to the cache
“C” flashes twice
per second
Remaining memory capacity: Low
An alarm message
appears instead of
“C”.
Remaining memory capacity:
None (disc full)
Notes