


93
Disc Operations
Chapter 5 Operations in GUI Screens
5
Check the information that appears, and press the
PUSH SET(S.SEL) knob.
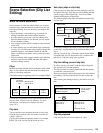
To sort planning metadata
You can sort planning metadata by operating in the same
way as in “To sort clip lists” (page 91). However, in step
3, select Sort Planning Metadata by....
The planning metadata will be displayed in the specified
order the next time you load planning metadata.
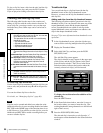
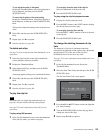
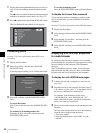
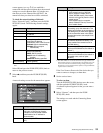
To check planning metadata properties
You can check the properties of the planning metadata that
is loaded into this unit’s memory, including the date and
time of creation and the clip titles.
See page 73 for more information about GUI screen
operations.
1
Display the Disc Menu.
2
Select Planning Metadata Properties, and then press
the PUSH SET(S.SEL) knob.
The Planning Metadata Properties screen appears.
File Name: Planning metadata file name
Assign ID: Assign ID
Created: Date and time of creation
Modified: Date and time of most recent modification
Modified by: Name of person who modified the file
Title1: Title 1
1)
Title2: Title 2
Material Gp: Material group name
1)This can be set as the clip name (see page 151).
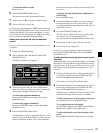
To scroll hidden parts of the string into view
When a b or B mark is displayed for an item, you can
press the B/IN or b/OUT button to scroll the display
by one character for each press.
The V/MARK1 and v/MARK2 buttons scroll the
beginning and end of the string into view.
To return to the previous screen
Press the PUSH SET(S.SEL) knob.
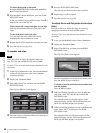
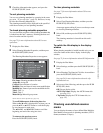
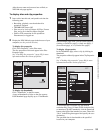
To clear planning metadata
See page 73 for more information about GUI screen
operations.
1
Display the Disc Menu.
2
Select Clear Planning Metadata, and then press the
PUSH SET(S.SEL) knob.
A message appears asking if you are sure that you want
to clear the plannning metadata.
3
Select OK, and then press the PUSH SET(S.SEL)
knob.
The planning metadata is cleared from this unit’s
memory.
To switch the title display in the display
window
When planning metadata is loaded into this unit, you can
select the format of the title to display in the display
window.
See page 73 for more information about GUI information.
1
Display the Disc Menu.
2
Select Settings, and then press the PUSH SET(S.SEL)
knob.
3
Select Planning Clip Name in Clip Info. Area and then
press the PUSH SET(S.SEL) knob.
See page 24 for more information about the clip
information area.
4
Select one of the following, and then press the PUSH
SET(S.SEL) knob.
Off: Do not display a title.
ASCII Clip Name: Display the ASCII format title
(see page 151)
Clip Name: Display the UTF-8 format title (see
page 151)
Checking user-defined essence
marks
You can display the names of user-defined Shot Mark0 to
Shot Mark9 essence marks in planning metadata (UTF-8
format, maximum 32 bytes).