


VIS-CAM System
36 System Set-Up
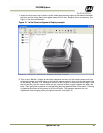
4.1.7 Drive and Park the Setup Vehicle Correctly
• Drive the setup vehicle slowly towards the trigger line through the center of the cameras field
of view in the same manner (heading) as a typical driver would occupy this lane.
Note: This is important, make sure that the vehicle is driven exactly the same way as the average
driver would through the section of roadway being viewed by the camera.
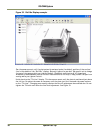
• Stop the vehicle approximately one foot (0.3 meter) past the trigger line. Make sure that the
vehicle is parked aimed in the same direction as the average driver would point their car if they
were driving through this section of roadway.
• To help the driver of the vehicle properly aim the car while driving, instruct him (or her) to
always look forward down the road as they would normally. Use a sound to signal the driver
when to stop.
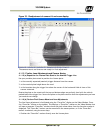
4.1.8 Properly Position the License Plate Stand
Using your portable plate stand, position a license plate:
• at the minimum expected trigger distance from the camera.
• at the minimum expected plate height above the road.
• at the location along the trigger line where the center of the horizontal field-of-view of this
camera is desired.
Rotate the plate on the stand until the top and bottom edges are level with the vehicle parked
behind the trigger line (to within a + or – a couple of degrees). Secure the plate on the plate stand
so that the adjustments you have just made do not change.
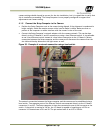
4.1.9 Perform Initial Lens Adjustment and Camera Aiming
1. Back away all of the thumbscrews on the lens holder until they do not touch the knurled
adjustment rings on the lens.
2. Make sure the lens aperture adjustment is fully open (rotate the third ring from the front of the
lens fully counter-clockwise until it stops at the f1.2 setting). Secure the thumbscrew that lines
up with the aperture ring until it just presses against the ring. Next tighten the thumbscrew that
lines up with the knurled ring closest to the camera body until it just presses against the lens. Do
not tighten any Lens Holder thumbscrews beyond a slight pressure against the lens.
3. Loosen the roll, pan, and tilt bolts on the JAI camera mounting head until each axis can be easily
adjusted by hand but any particular setting will stay in place after you let go.
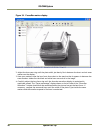
4. Power on the Setup computer and then start the ENSetup program. Press the “Video Window”
button to open the Video Window and then select the camera for adjustment from the tree-view
on the left side of the window. Press the “Live” button in the toolbar to start the video
streaming. Press the “Tilt Line” button to show the alignment guidelines. The “Tilt Line” can be
moved using the mouse, or if the “Tilt Line” is selected, using the arrow-keys.
5. Interactively adjust the roll, pan, and tilt of the camera mount and the lens zoom and focus
rings:
6. Adjust the lens focus ring (and camera pan and tilt as necessary) to obtain a focused image of the
plate on the plate stand. If at any time you cannot fully focus the plate because the focus ring on
the lens has reached the end of its turning movement, perform the back-focus procedure
described in the JAI document titled “Zoom Lens Back-Focus Procedure.”