16
Getting Started
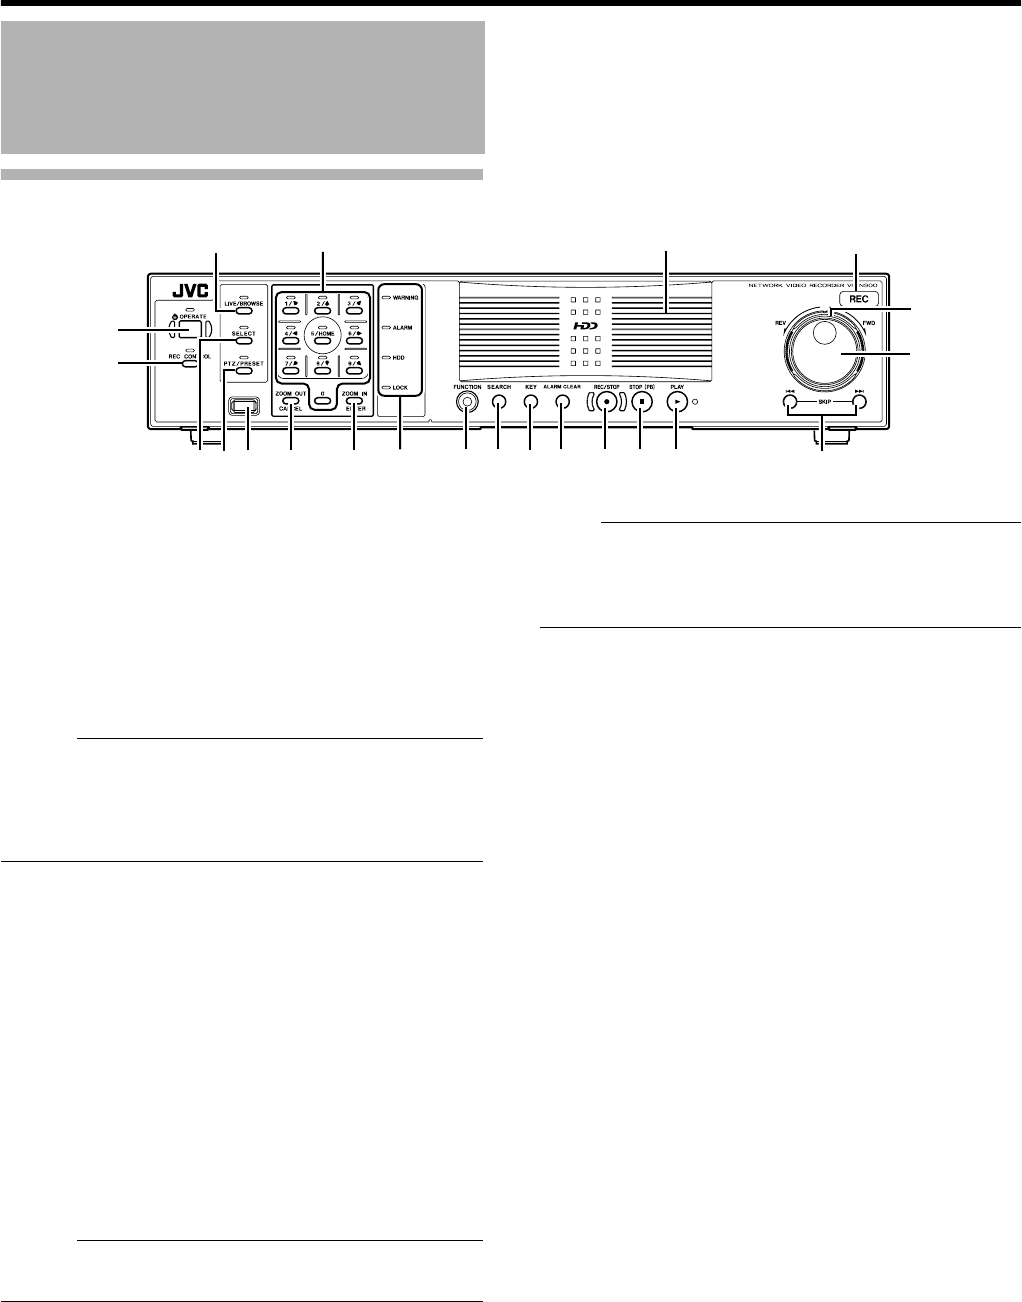
Front Panel
A
[OPERATE] Button/Indicator
Switches operation on or off. Press the button to turn operation
A
ON
B
and hold down the button to turn operation
A
OFF
B
. The
indicator blinks while the recorder is starting up or shutting down.
B
[REC CONTROL] Button/Indicator
Switches the recording control mode on or off. The indicator lights
up when the recording control mode is set to on.
Press and hold the [FUNCTION] button, and press the [REC
CONTROL] button at the same time to display the menu.
Memo :
●
The main menu cannot be displayed in the recording control
mode or during recording.
●
The recording control mode performs recording in accordance
with the settings in the [Camera Record Setting] menu.
(
A
Page 53)
C
[SELECT] Button/Indicator
Use the
S
key to set to the camera selection mode. The indicator
lights up when the camera selection mode is set to on. (
A
Page 36)
Press the [FUNCTION] button, [ALARM CLEAR] button and the
[SELECT] button at the same time to reboot the NVR Viewer as well
as the internal distribution server.
D
[PTZ/PRESET] Button/Indicator
Switches between the PTZ mode and PRESET mode of the
S
key.
The mode changes each time the button is pressed. The indicator
lights up when PTZ mode is selected and blinks when PRESET
mode is selected.
E
[SERIAL] Terminal
For connecting the communication control terminals on a mouse
(sold separately), flash memory (sold separately) or UPS (sold
separately).
Memo :
●
Use the [SERIAL1 to 4] port on the rear panel for additional hard
disk drive connection. (
A
Page 14)
Note :
●
Attach the serial port cover supplied with this product if this port
is not in use.
●
This product may malfunction due to the presence of static
electricity. Remove any static before starting operation.
F
[ZOOM OUT/CANCEL] Button
Selects ZOOM OUT (
A
Page 35) when PTZ mode is selected and
selects a view in PRESET mode.
Cancels the selected values in the Main Menu window. Also,
pressing the [ZOOM OUT/CANCEL] button while holding down the
[FUNCTION] button changes the resolution of VGA output.
G
[ZOOM IN/ENTER] Button
Selects ZOOM OUT (
A
Page 35) when PTZ mode is selected and
selects a view in PRESET mode.
Sets the selected values in the Main Menu window. Also, pressing
the [ZOOM IN/ENTER] button while holding down the [FUNCTION]
button changes the resolution of VGA output.
You can control the click action of the mouse when the software
keyboard is displayed. (
A
Page 28)
H
Status indicators
Ⅵ
[WARNING] Indicator
Lights up when an error occurs. (
A
Page 156)
Press and hold the [ALARM CLEAR] button to turn off the light.
Ⅵ
[ALARM] Indicator
Lights up when an alarm is activated.
Goes off when the [ALARM CLEAR] button is pressed.
Ⅵ
[HDD] Indicator
Lights up when the built-in hard disk drive is accessed.
Ⅵ
[LOCK] Indicator
Lights up when operation is locked. (
A
Page 22)
I
[FUNCTION] Button
Press the [FUNCTION] together with another button to use the
corresponding features.
[Special Key Operations] (
A
Page 138)
Press the [FUNCTION] button, [ALARM CLEAR] button and the
[SELECT] button at the same time to reboot the NVR Viewer as well
as the internal distribution server.
Part Names and Functions
(VR-N900U)
A
V
B
I
H
EDC
K
JLM
O
N
Q
P
R
STU
F G


